This post contains affiliate links, which means I may earn a commission if you purchase through those links (at no extra cost to you).
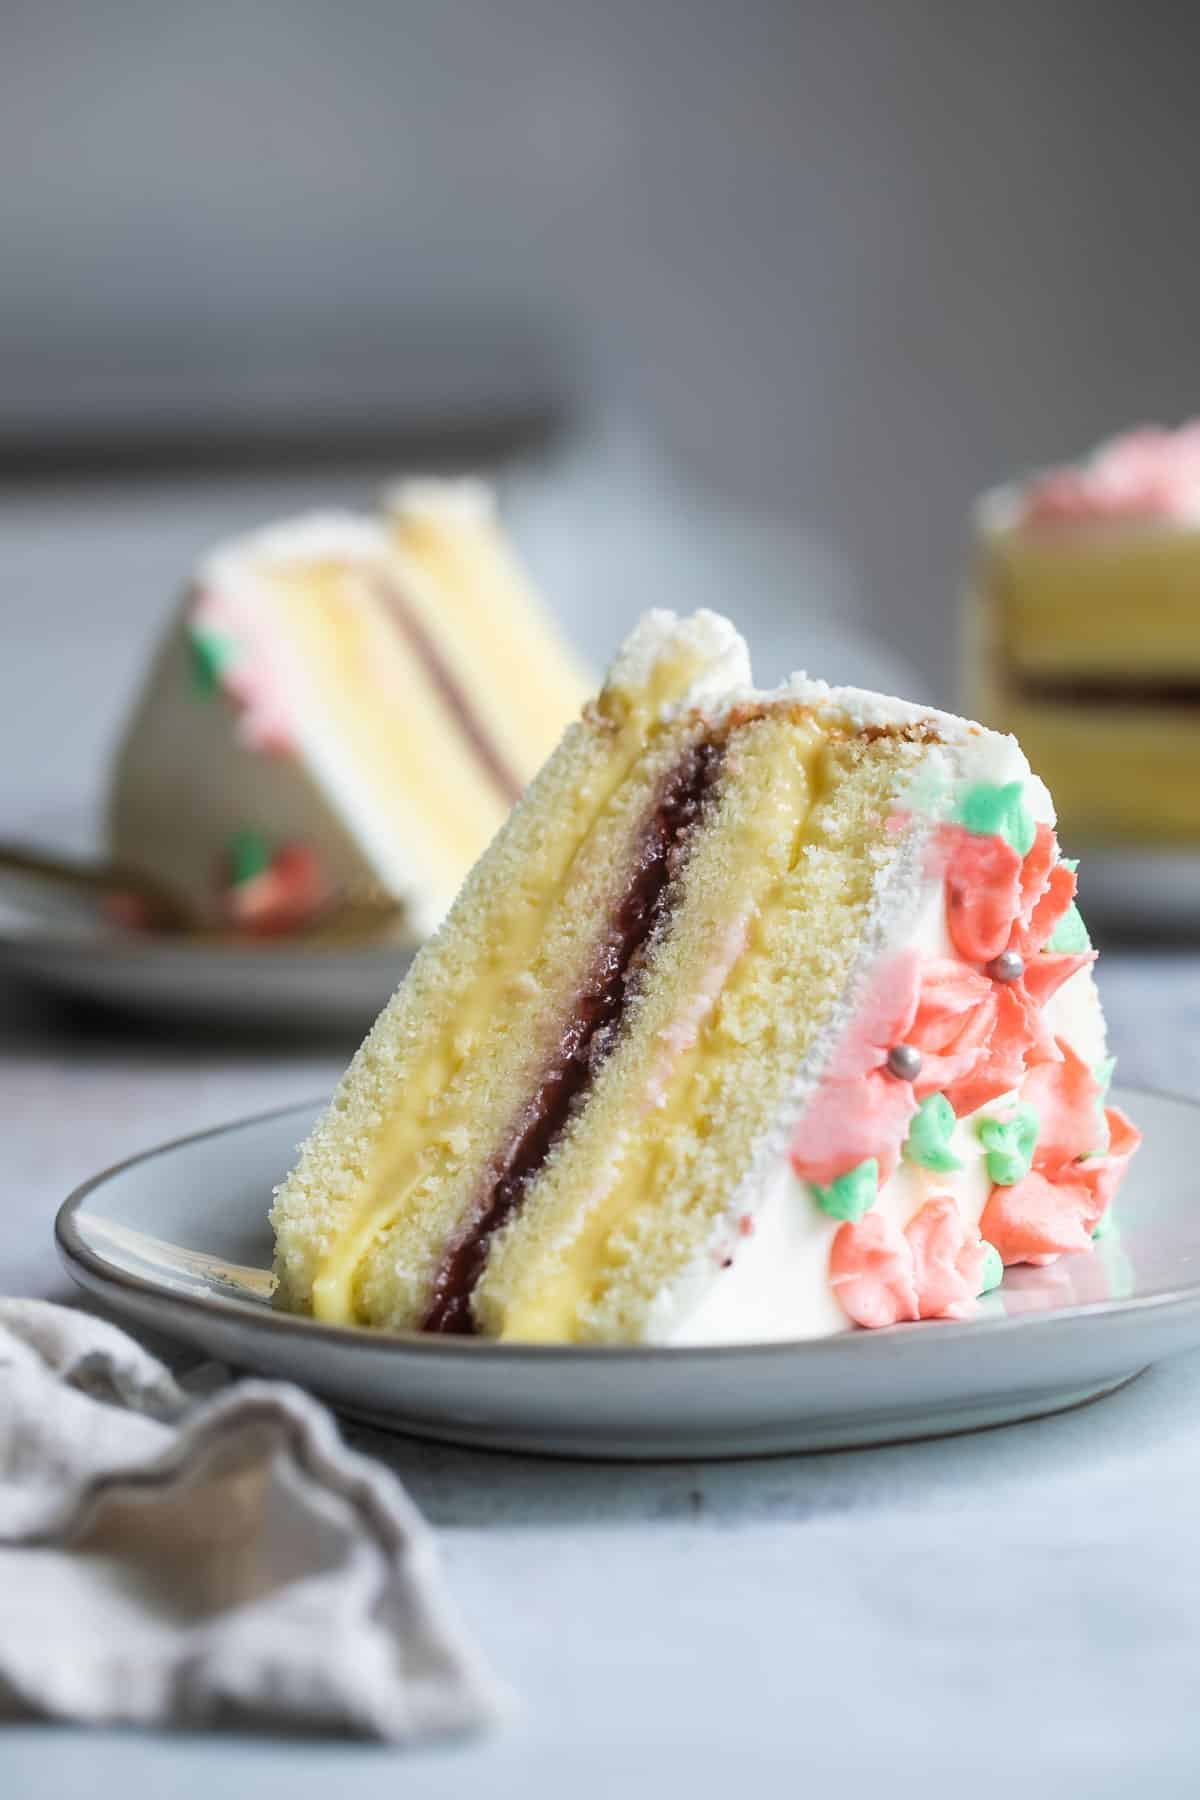
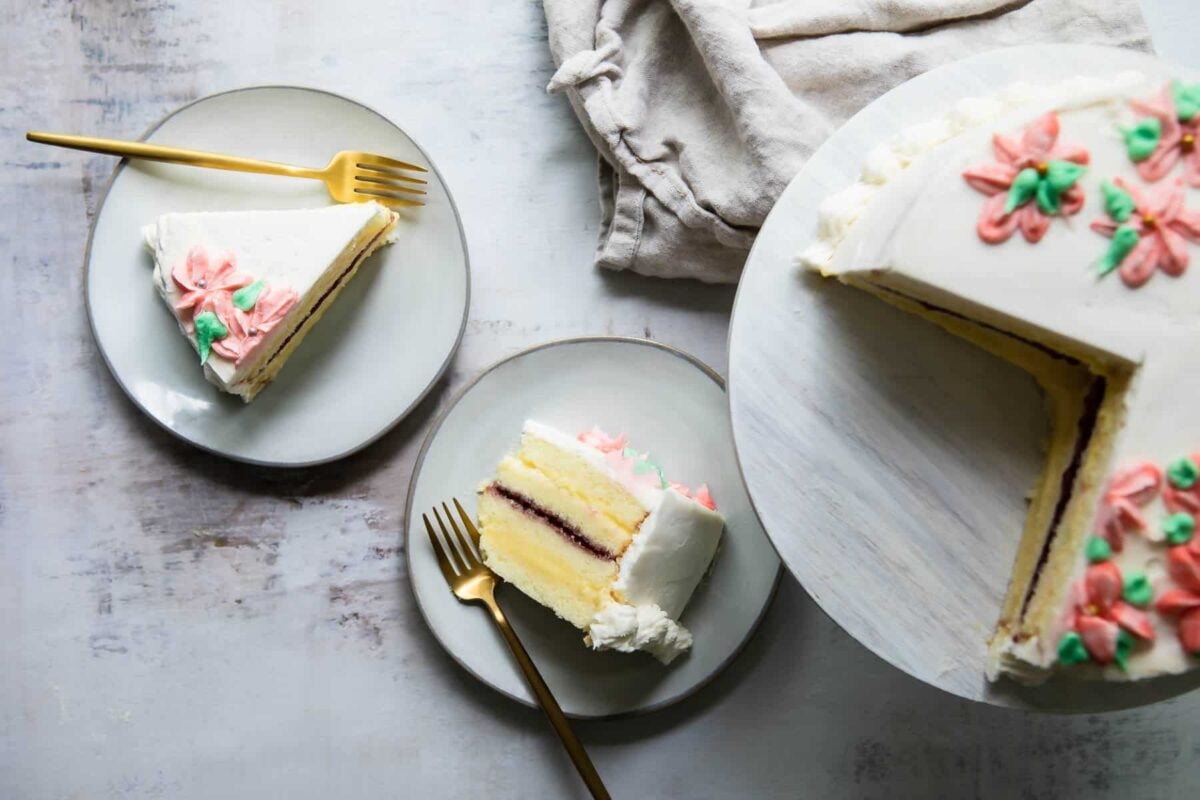
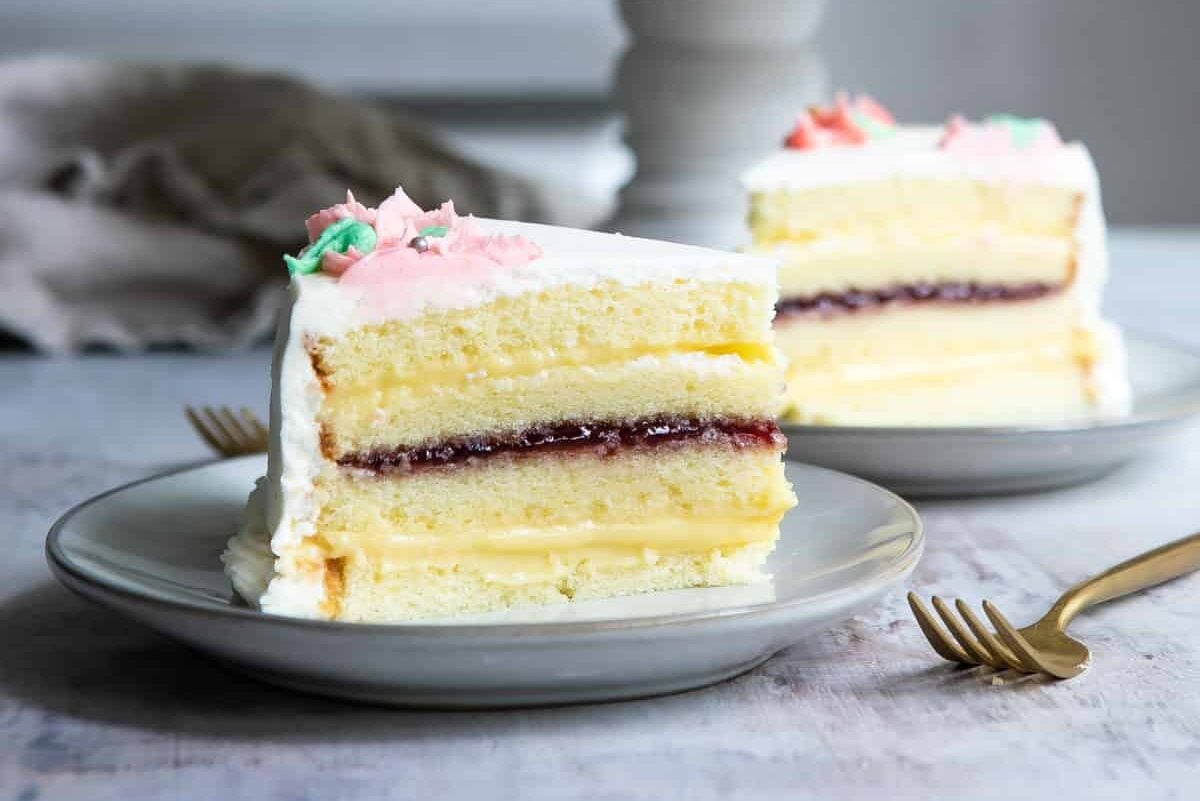
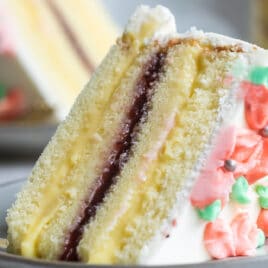
Danish Layer Cake is a specialty dessert popular in Racine, Wisconsin. It has 7 layers of total of soft vanilla cake, homemade pastry cream, and raspberry jam, all covered in a luscious vanilla buttercream frosting.
When I was growing up, I loved it when my mom made me Danish Layer Cake for my birthday.
Her side of the family is from a town called Racine, Wisconsin (home to Danish Bakery legend O&H), so Danish Layer Cakes were part of the fabric of her childhood.
She made things easy by starting with a boxed mix, but I’m returning this cake to it’s full glory with full-on from-scratch status.
Table of Contents
Recipe ingredients
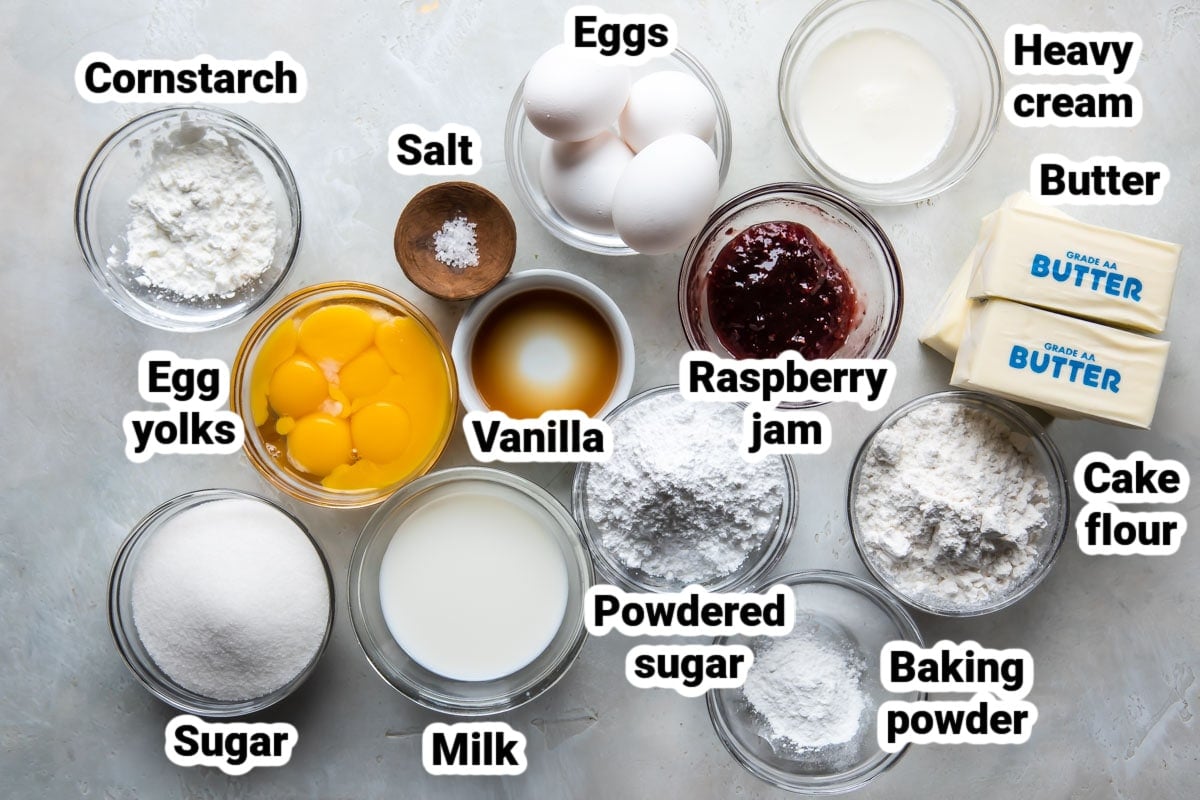
At a Glance: Here is a quick snapshot of what ingredients are in this recipe.
Please see the recipe card below for specific quantities.
Equipment and ingredient notes
- 8-inch cake pans: Do not substitute 9-inch cake pans.
- Whole milk: Do not substitute low-fat milk for the whole milk in the vanilla cake.
- Seedless raspberry jam: If you cannot track this down, raspberry jam with seeds, or another seedless jam, may be substituted. Strawberry seedless jam tastes great in this cake.
Step-by-step instructions
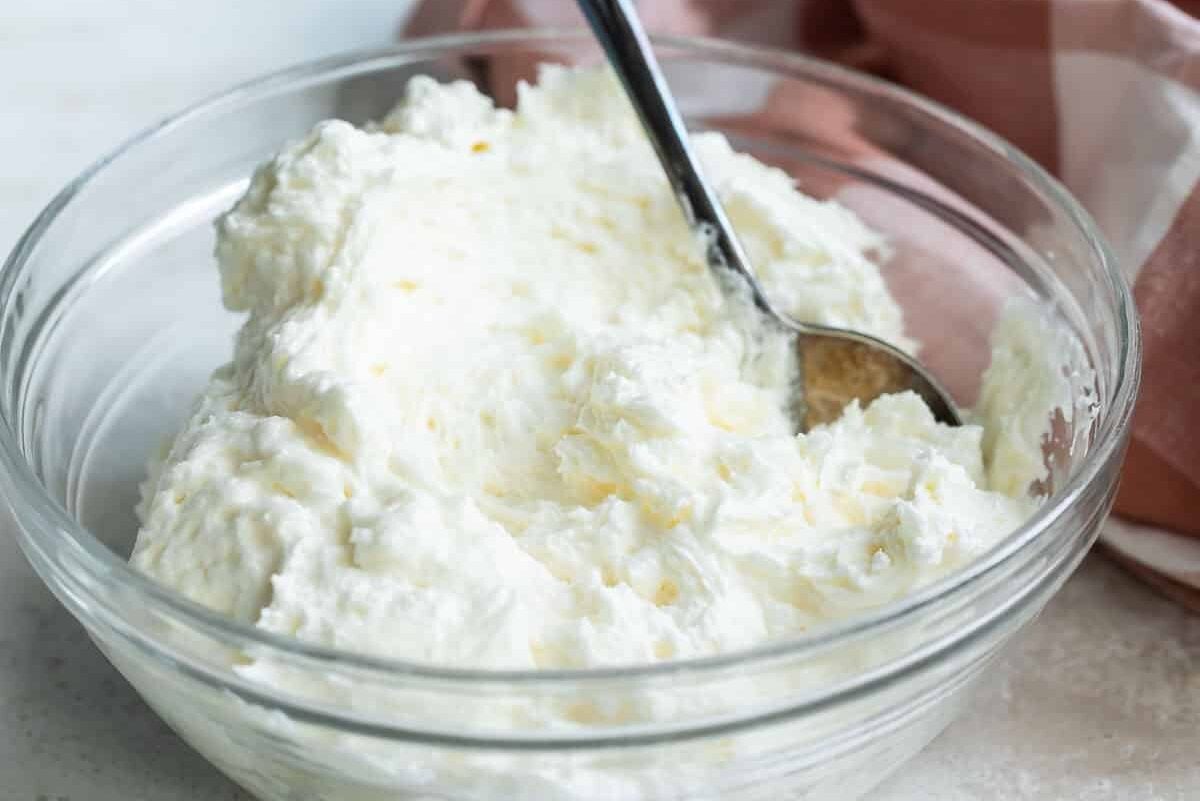
To make the pastry cream:
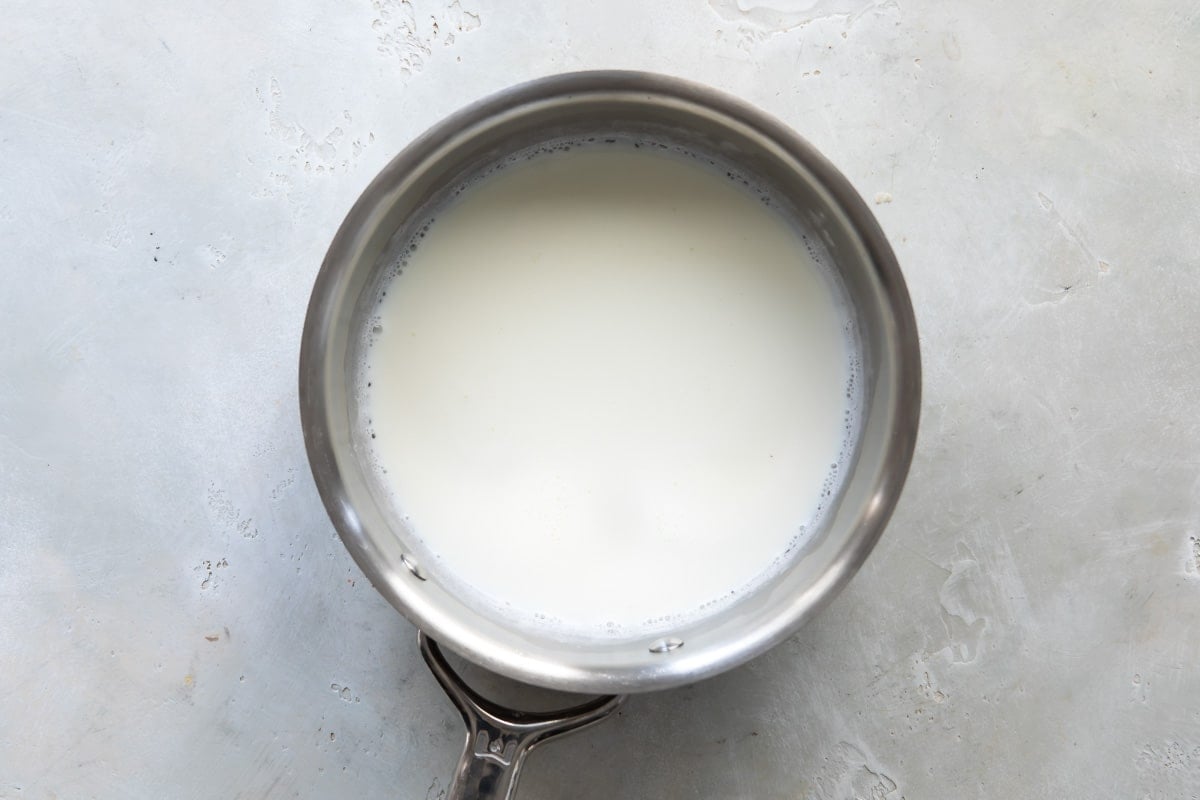
- In a medium non-aluminum saucepan over medium heat, warm milk until tiny bubbles appear on the surface, about 6 to 8 minutes (about 180 degrees Fahrenheit/82 degrees Celsius).
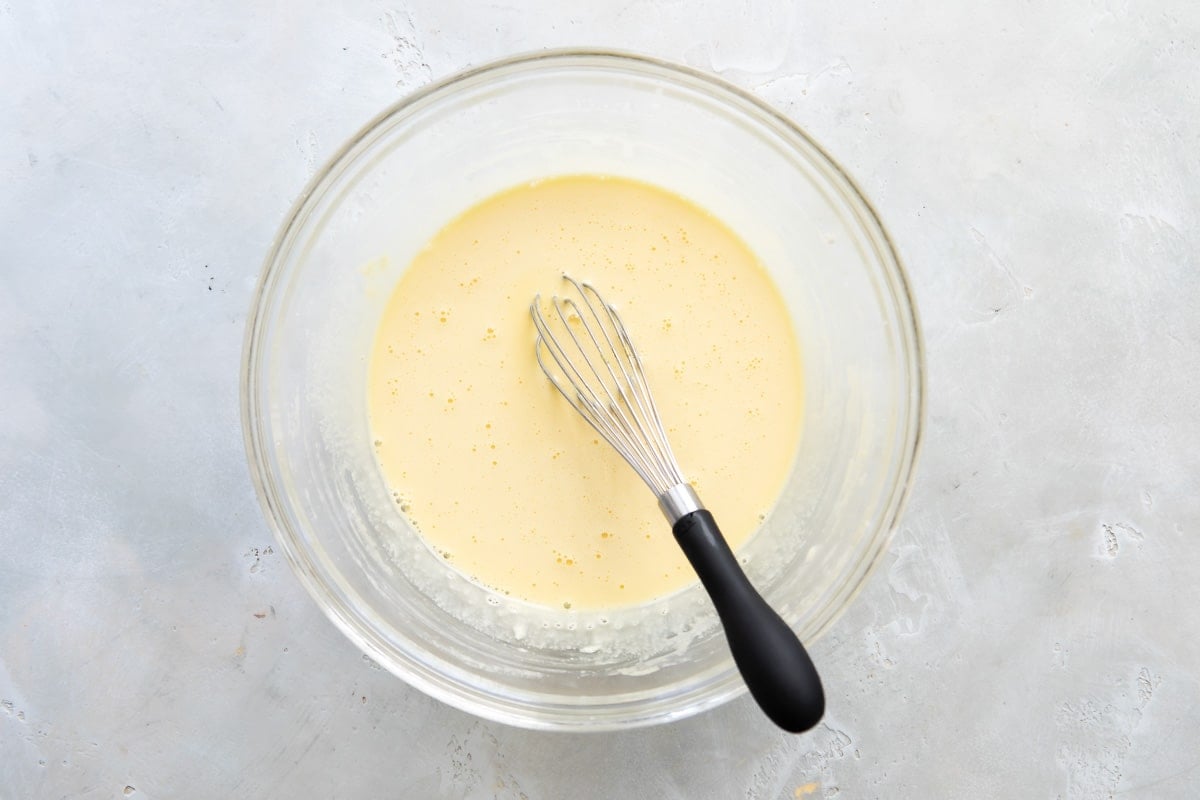
- Meanwhile, In a large bowl, whisk together egg yolks and sugar. Whisk in cornstarch and salt.
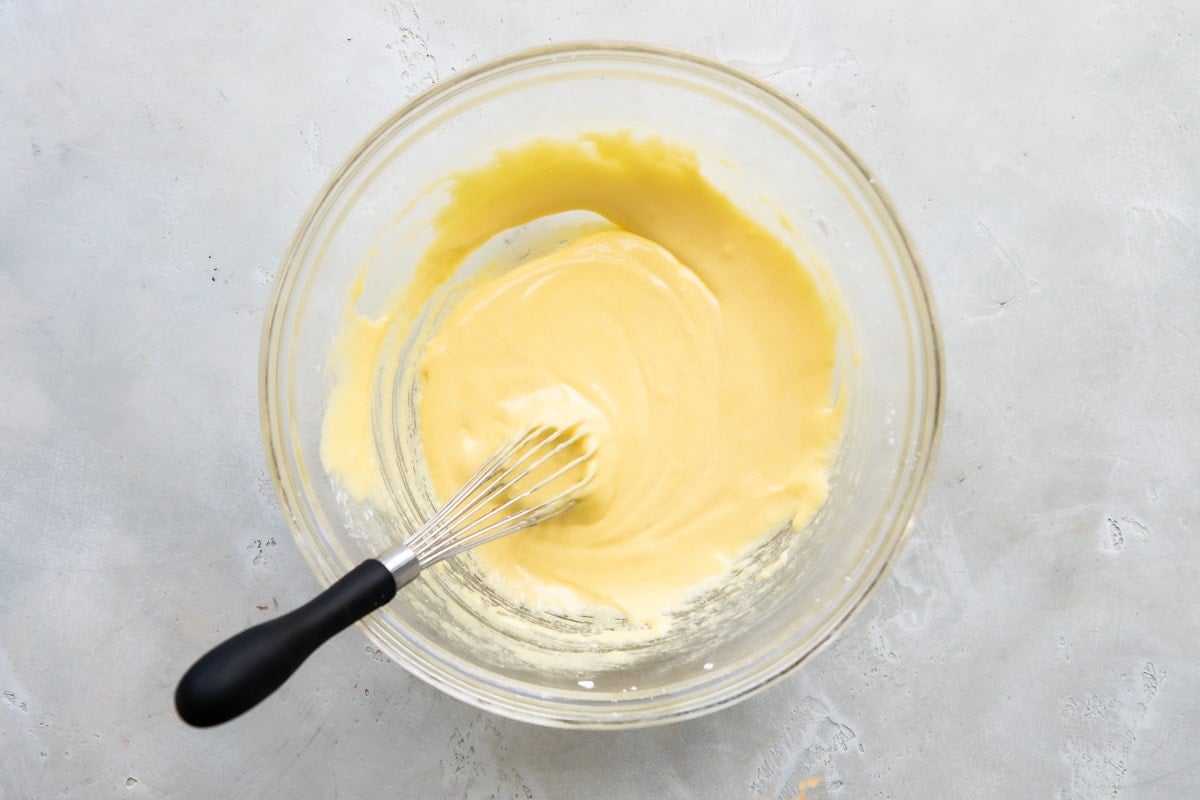
- While whisking constantly, pour in half of the hot milk.
- Whisk in remaining hot milk and return to saucepan.
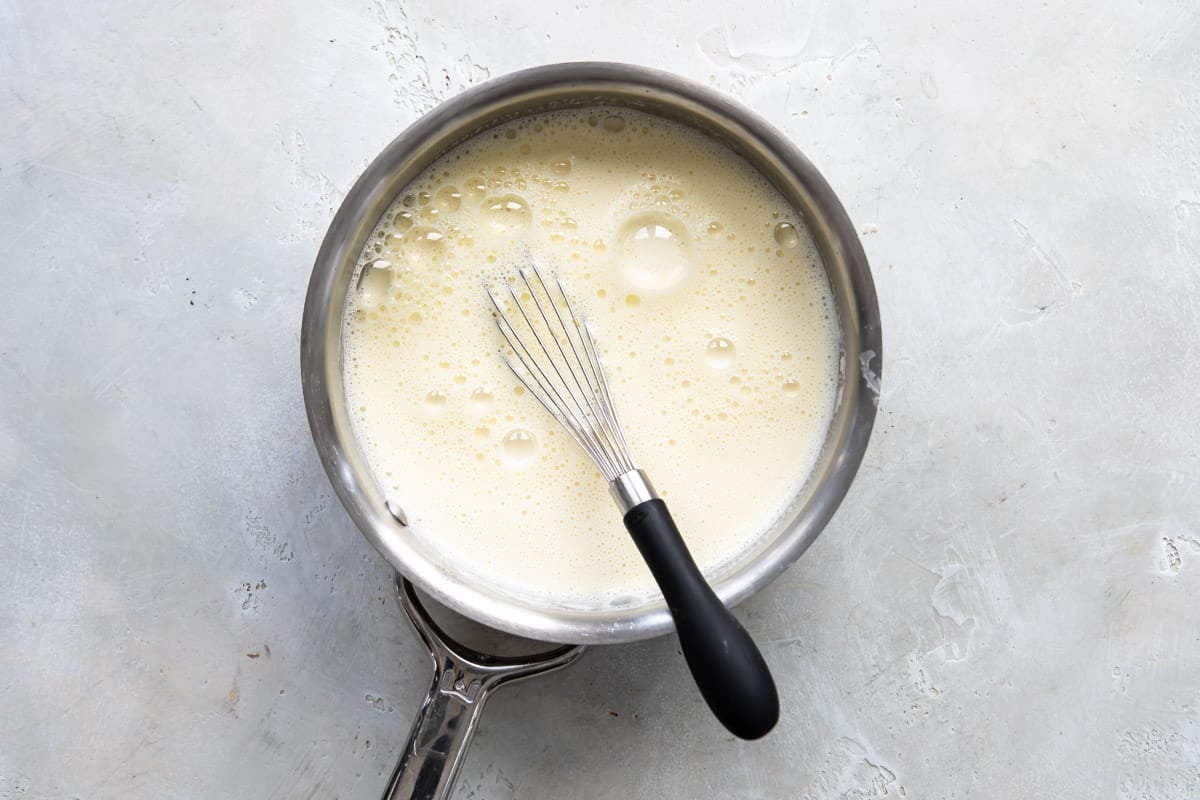
- Cook over medium heat, whisking constantly, until the mixture thickens to a firm consistency, about 5 to 8 minutes.
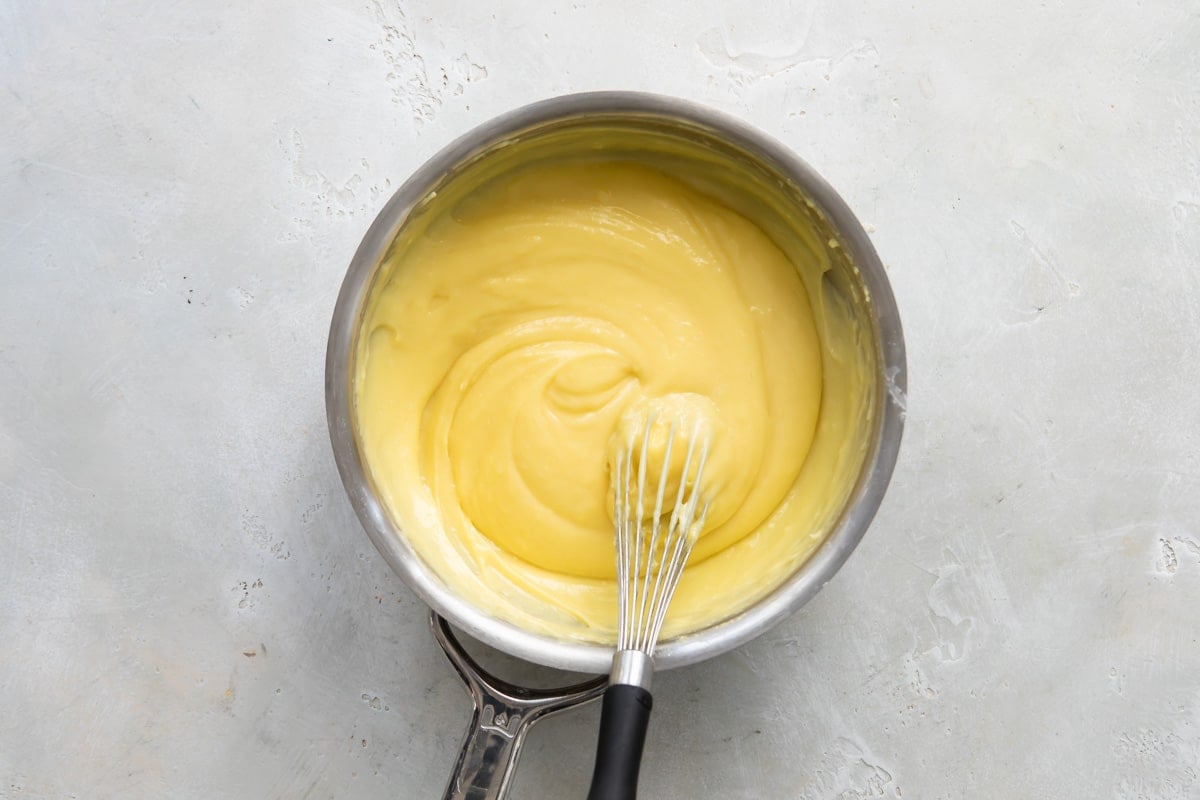
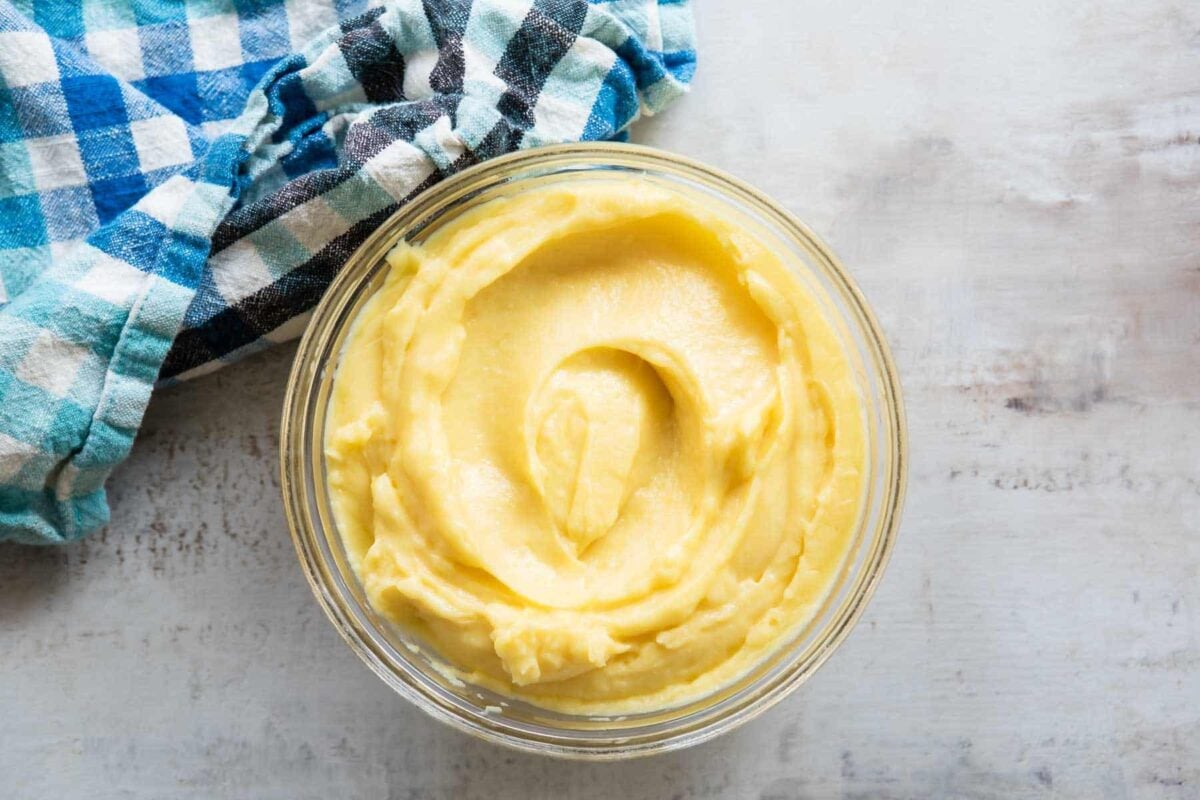
- Whisk in vanilla. Scrape in to a bowl. Cover with plastic wrap, pressing it directly on to the surface of the pastry cream.
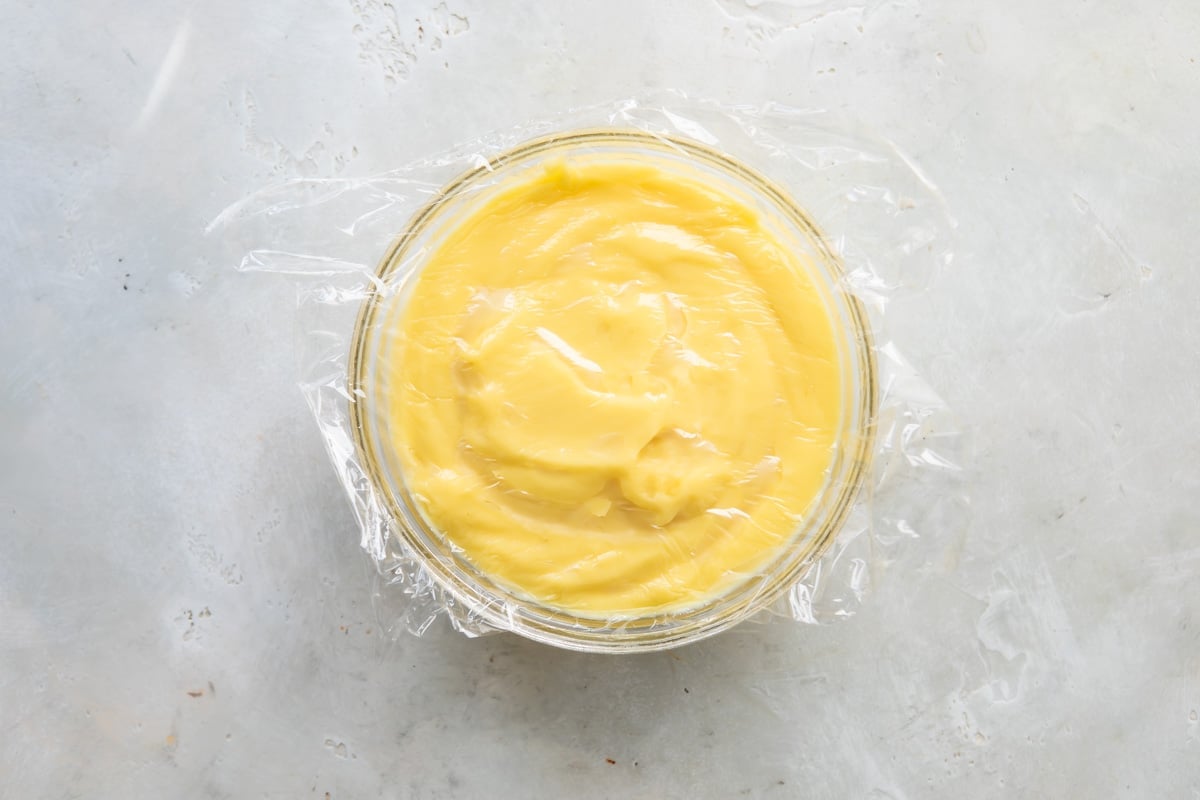
- Refrigerate until chilled, about 2 to 3 hours. (Note: You will have just over 2 cups of pastry cream and you only need about 1 ½ cups for this recipe.)
To make the cake:
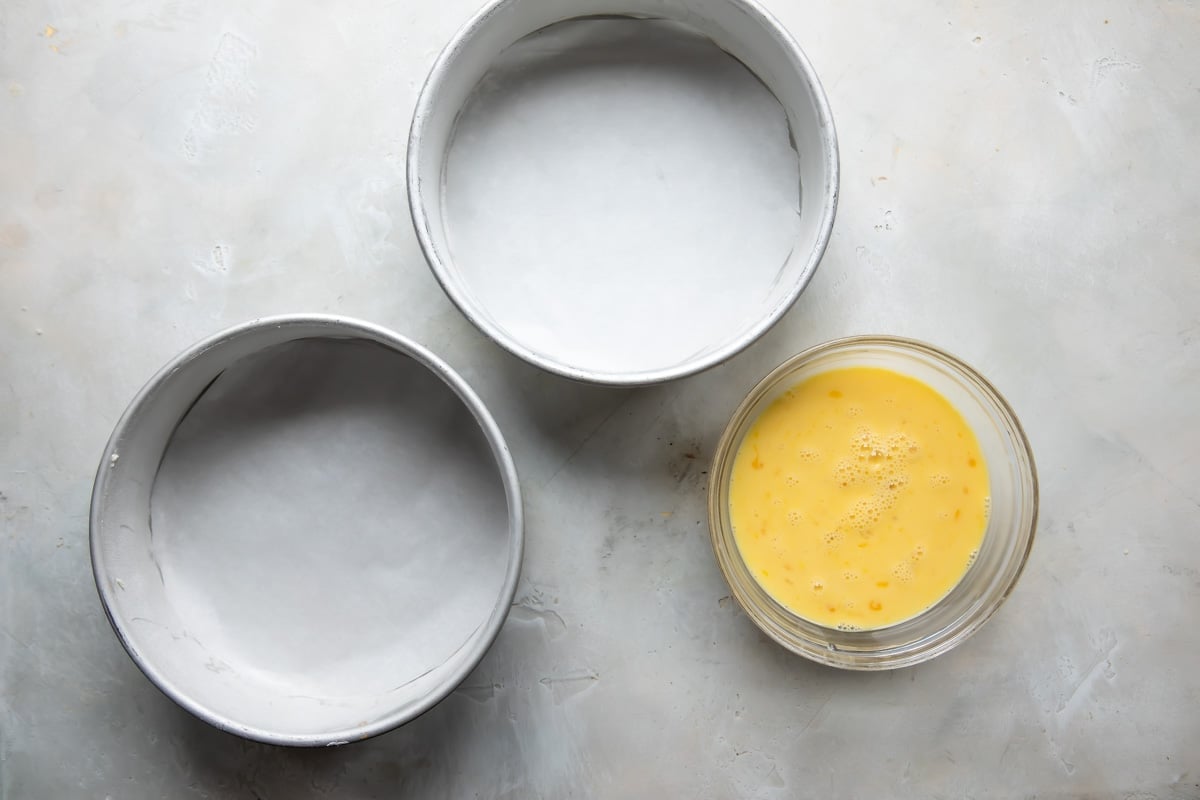
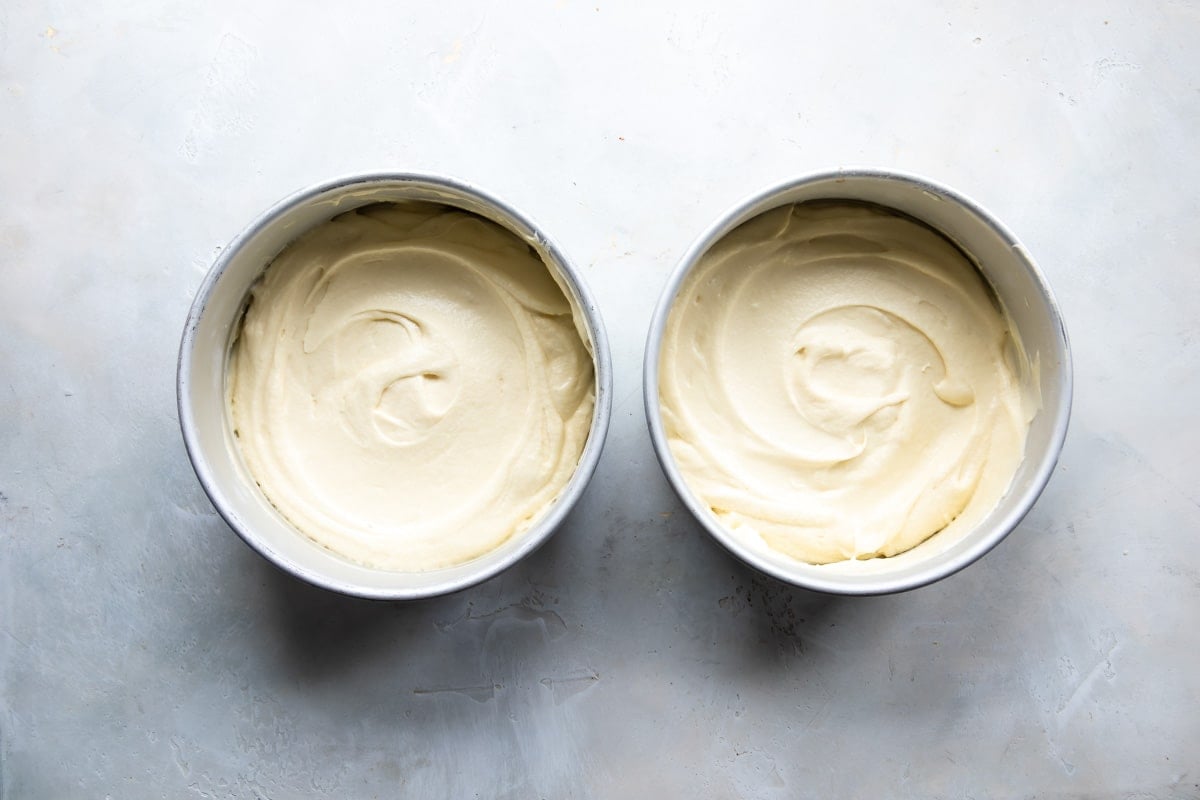
- Preheat oven to 350 degrees. Grease and flour 2 (8-inch) round cake pans, then line parchment paper. In a small bowl, whisk together milk, eggs, and vanilla. Set aside.
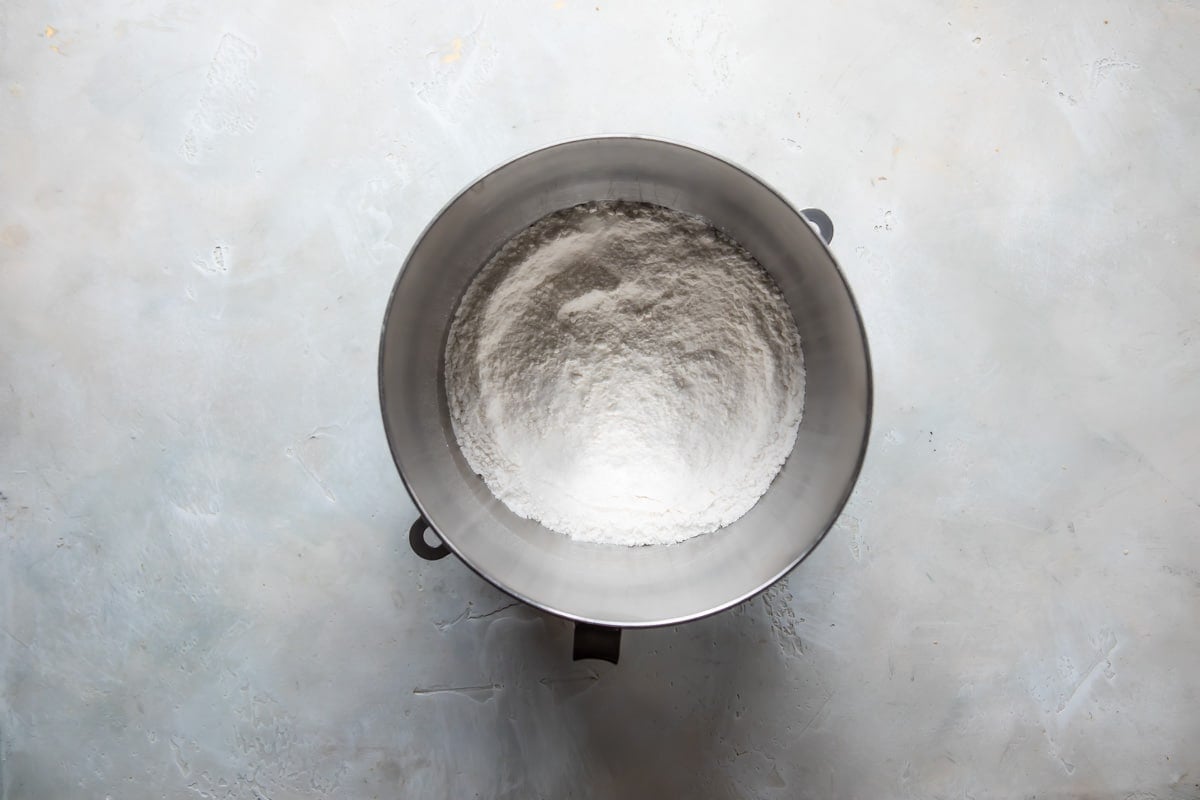
- In the bowl of a stand mixer fit with the whisk attachment, beat together flour, sugar, baking powder, and salt.
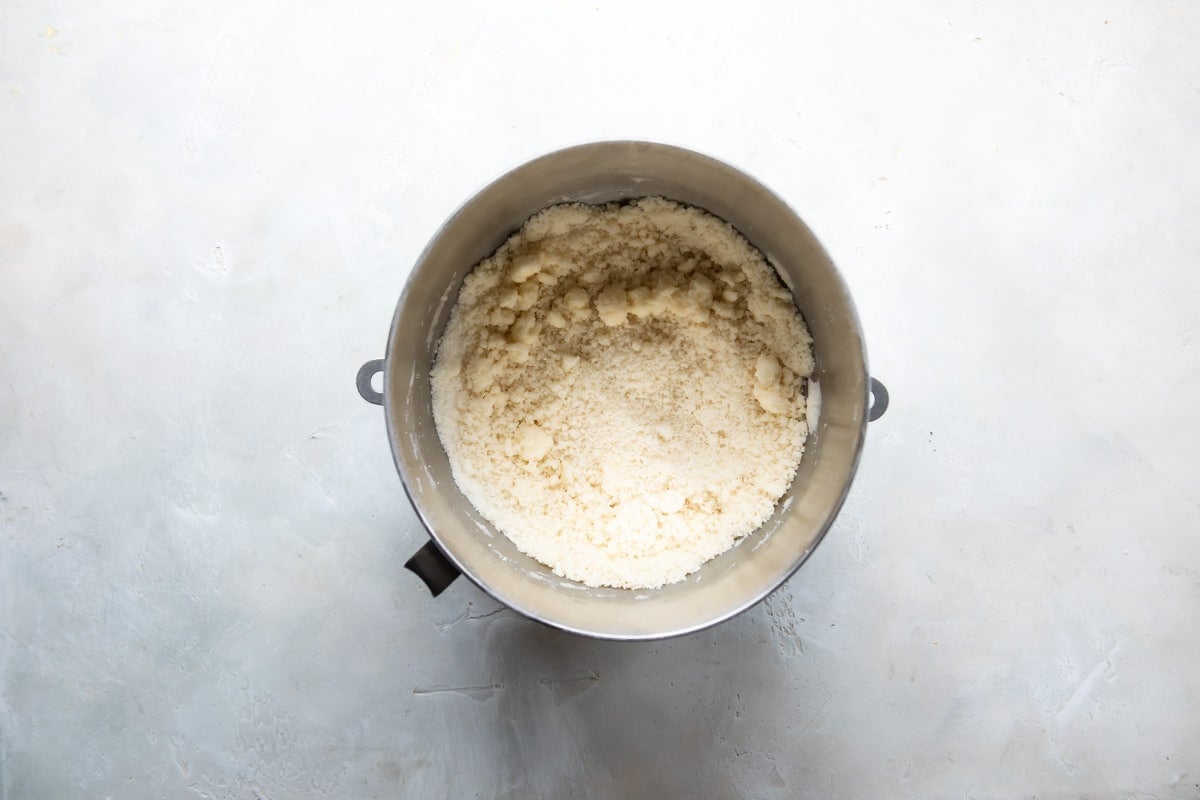
- With the mixer on medium-low speed, beat the butter in to the flour mixture one piece at a time. Continue beating until the mixture resembles moist crumbs, 1 to 3 minutes total.
- Add the milk mixture to the mixer and beat until light and fluffy, 1 to 3 minutes longer. Stir by hand with a rubber spatula to make sure the batter is fully combined.
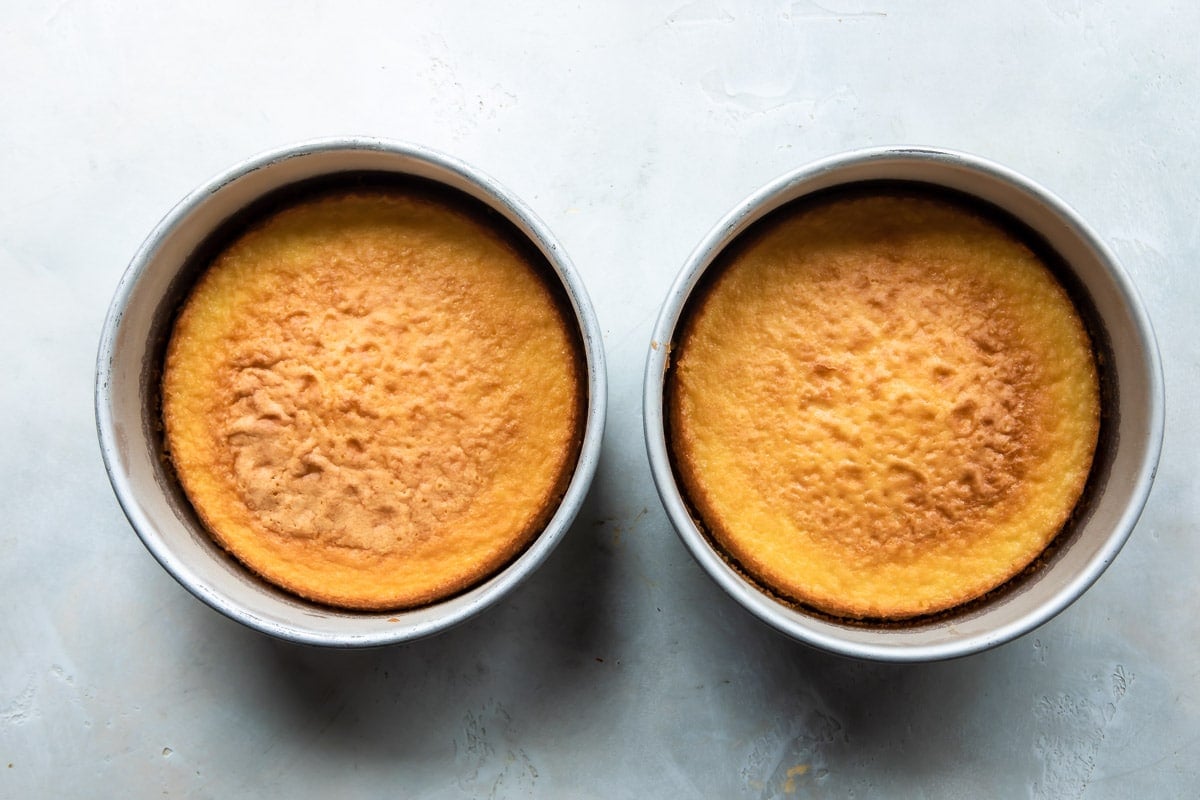
- Divide the batter evenly between both pans, gently tapping the pans on the counter to settle the batter. Bake until a toothpick inserted in the center of the cake comes out dry with a few crumbs attached, 20 to 25 minutes. Rotate the pans halfway through baking time.
- Cool the cakes in the pans for 10 minutes.
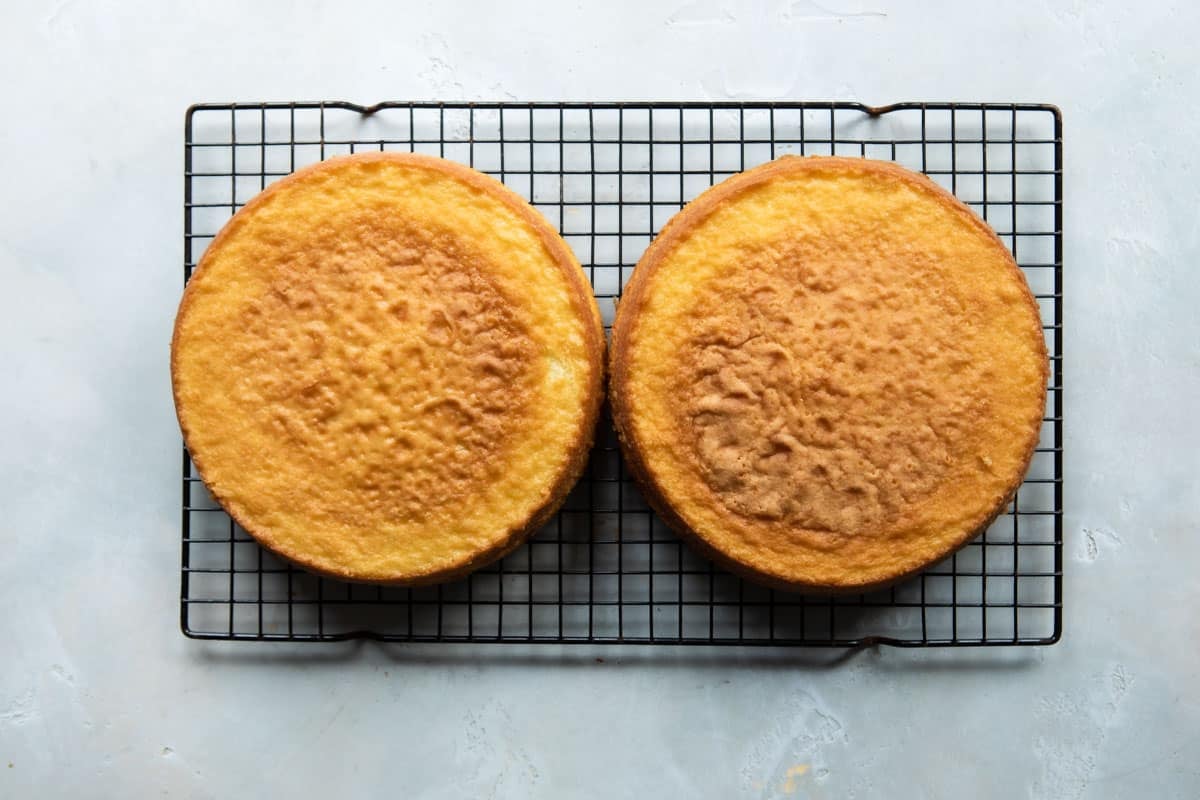
- Run a small sharp knife around the inside of each pan to loosen, then flip the cakes on to a wire rack. Peel off the parchment paper, then flip the cakes right side up to cool completely, about 2 hours.
To make the frosting:
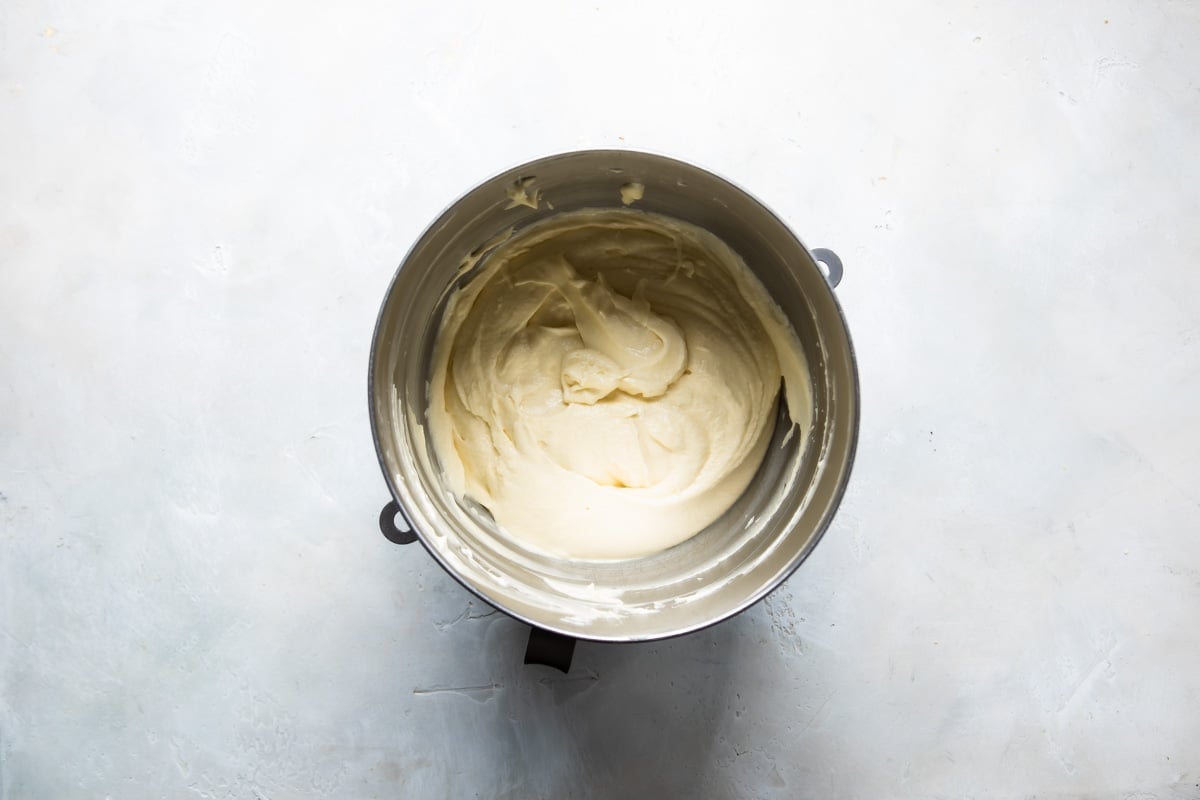
- In a stand mixer fit with the paddle attachment, cream butter until pale and fluffy, about 3 minutes. Reduce mixer speed to low. Add 4 cups powdered sugar, cream, vanilla, and salt (if using).
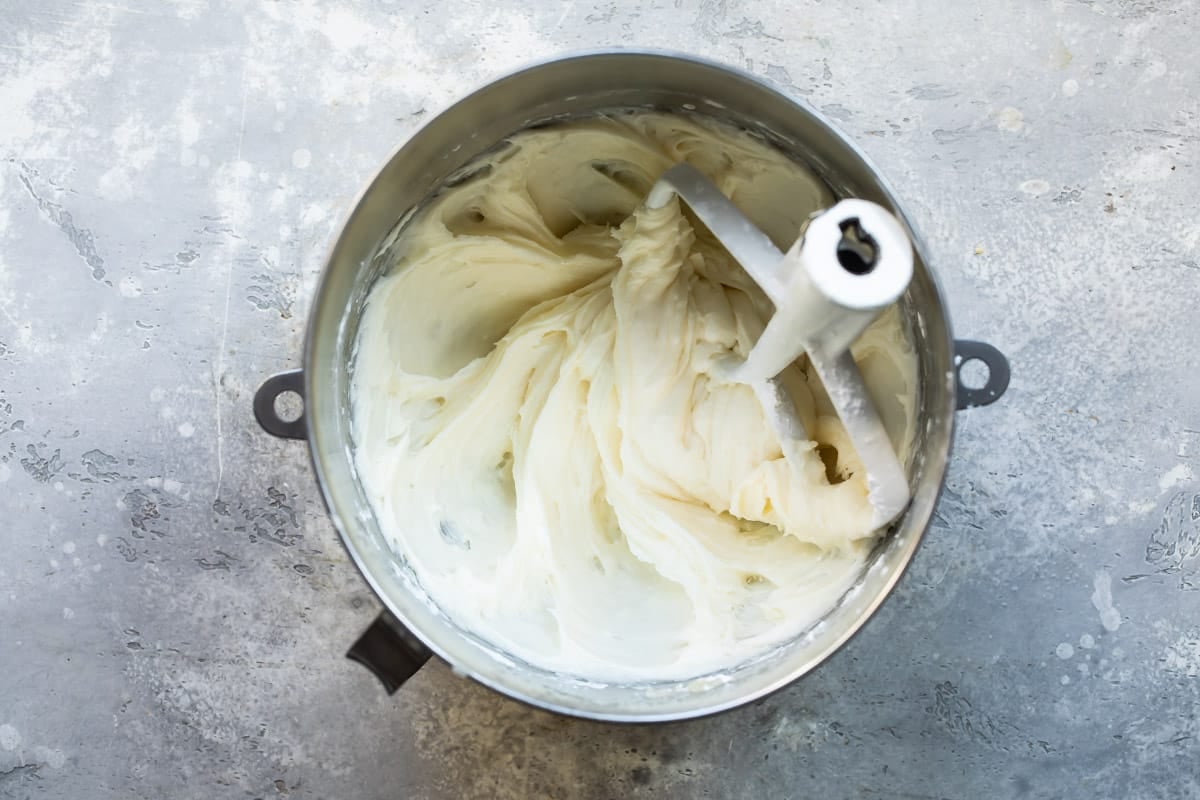
- Continue mixing 2 to 3 minutes longer. If the frosting seems too soft, add the remaining powdered sugar 2 tablespoons at a time.
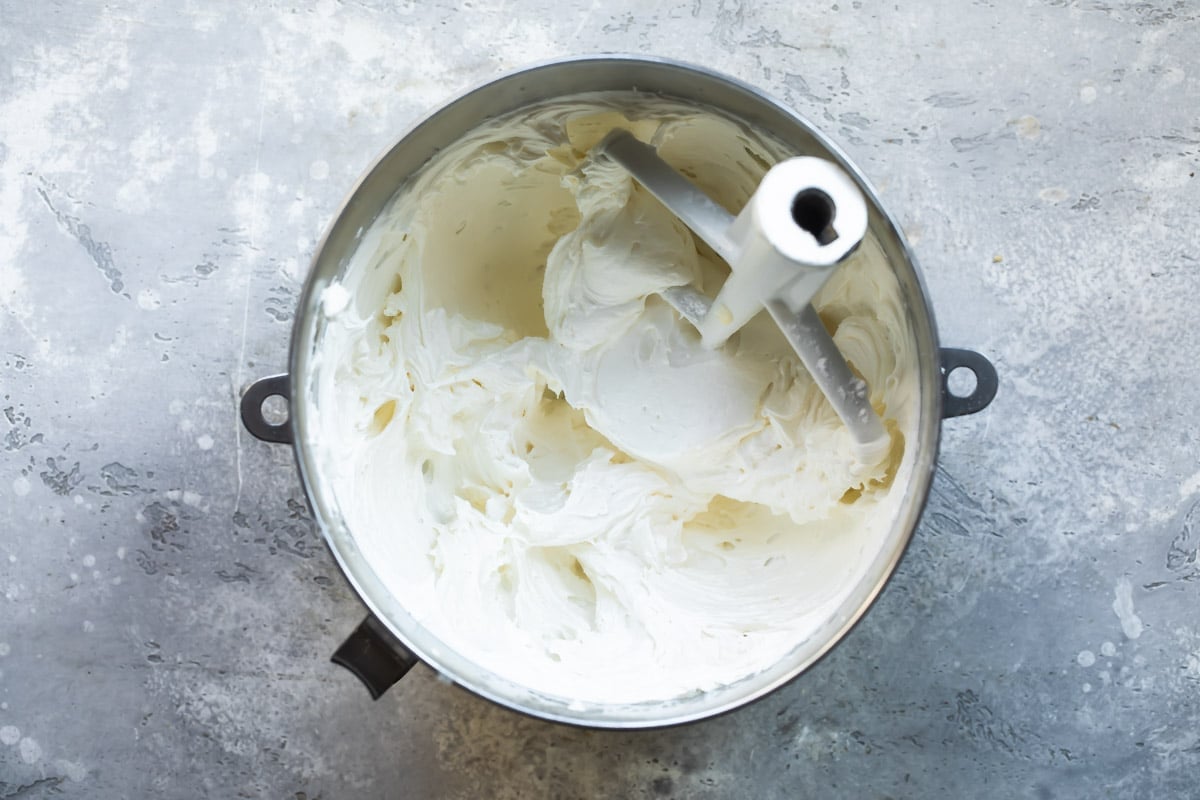
- Cover and refrigerate the frosting until assembling the cake, up to 1 week in advance.
To assemble the cake:
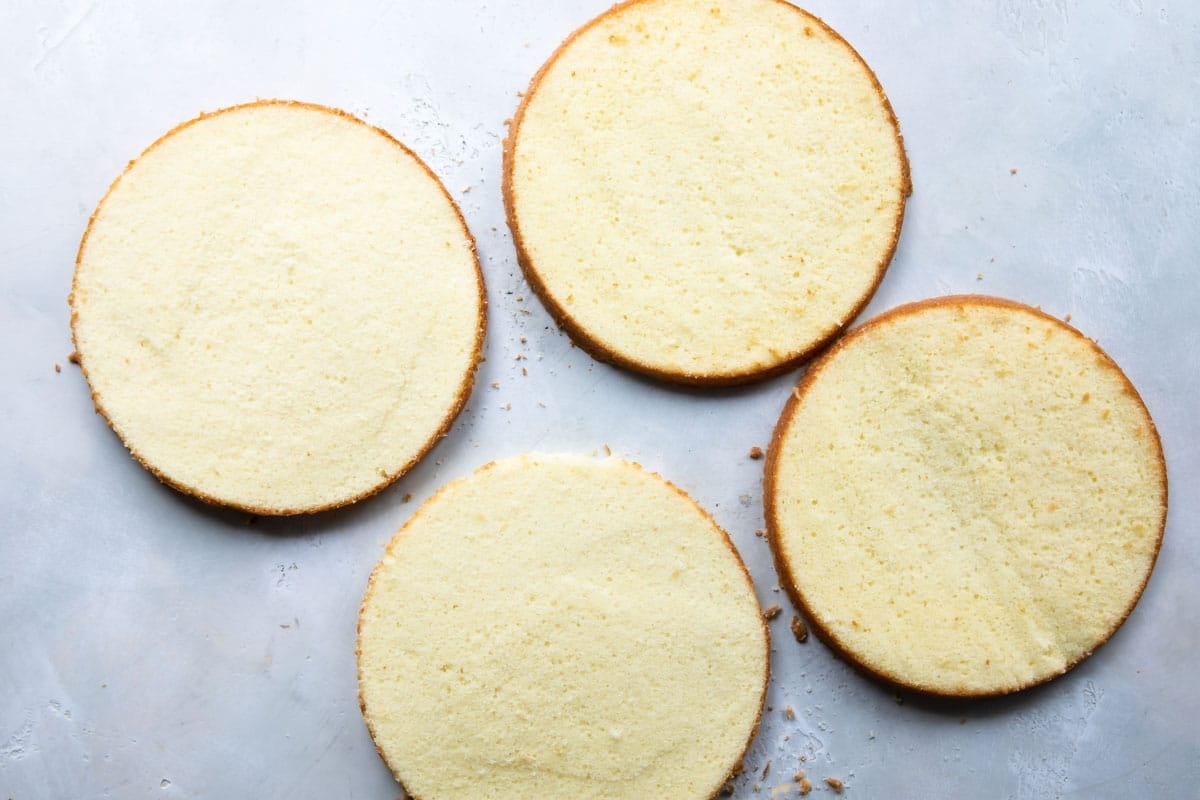
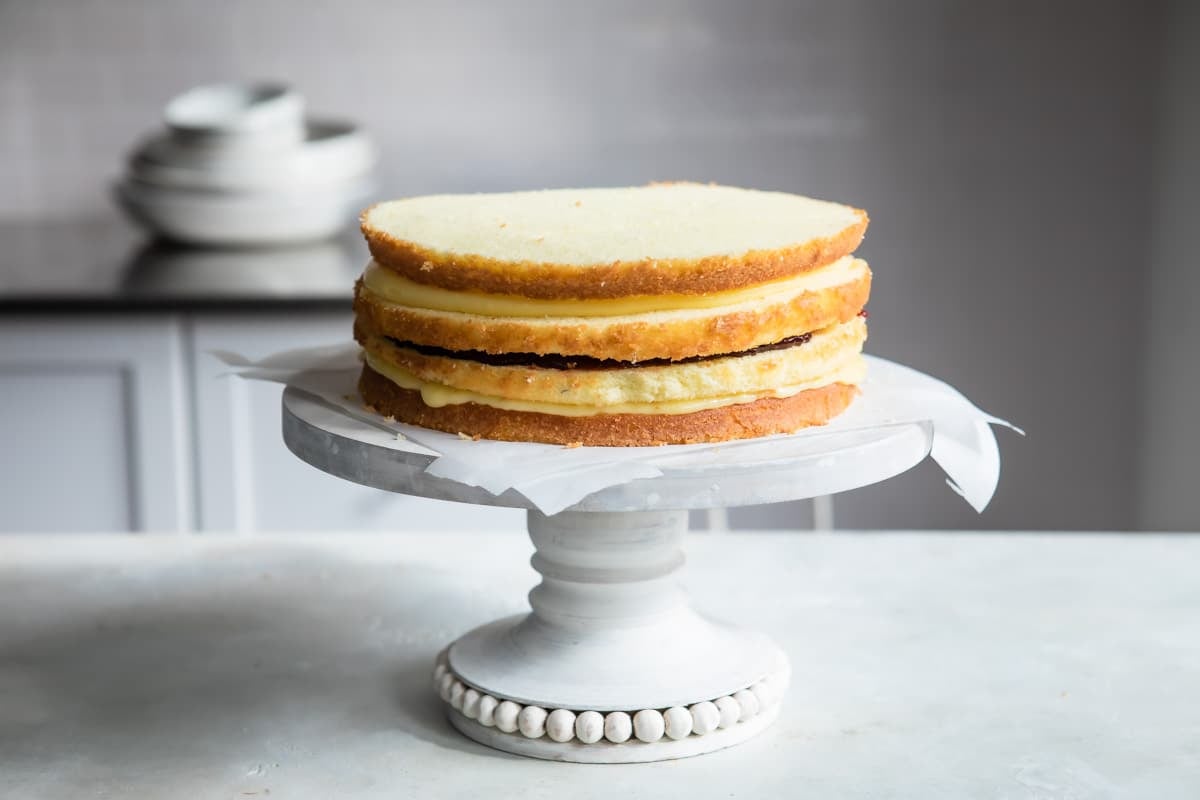
- Slice off any domed tops of your cake to ensure they are flat.
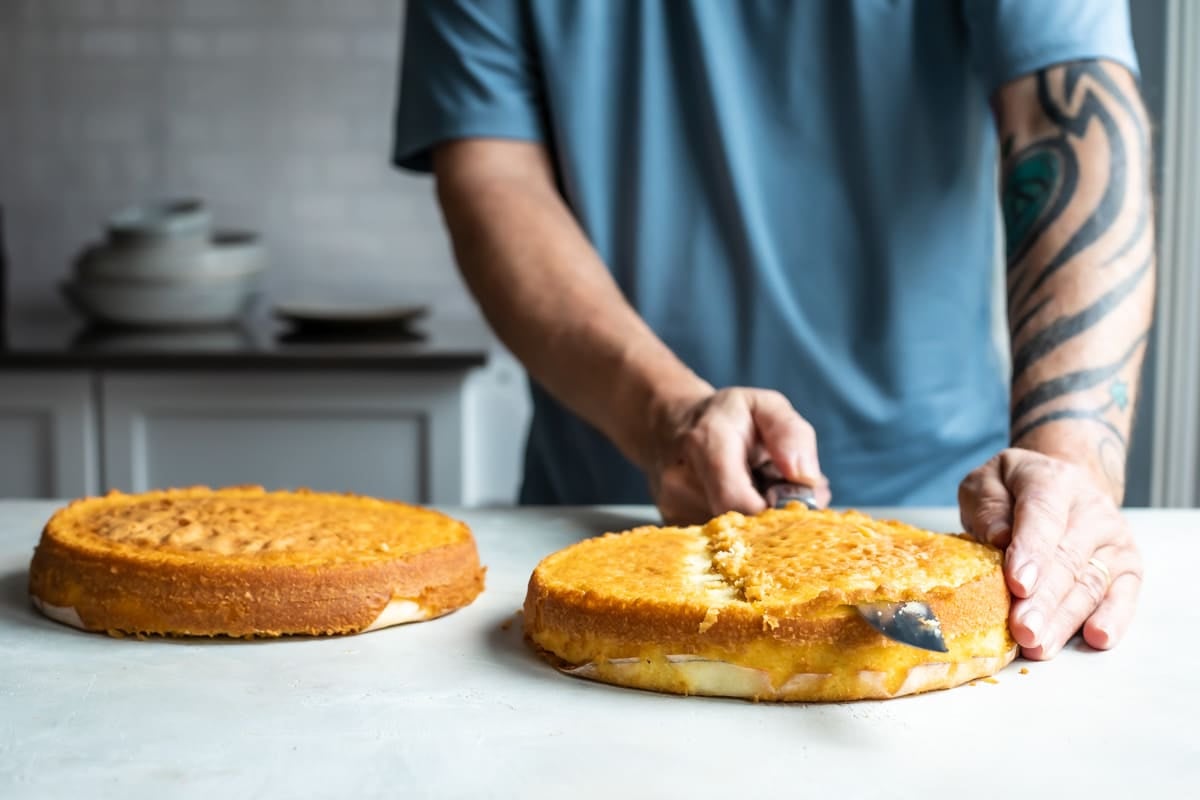
- Cut each cooled cake in half lengthwise so there are four layers of cake total.
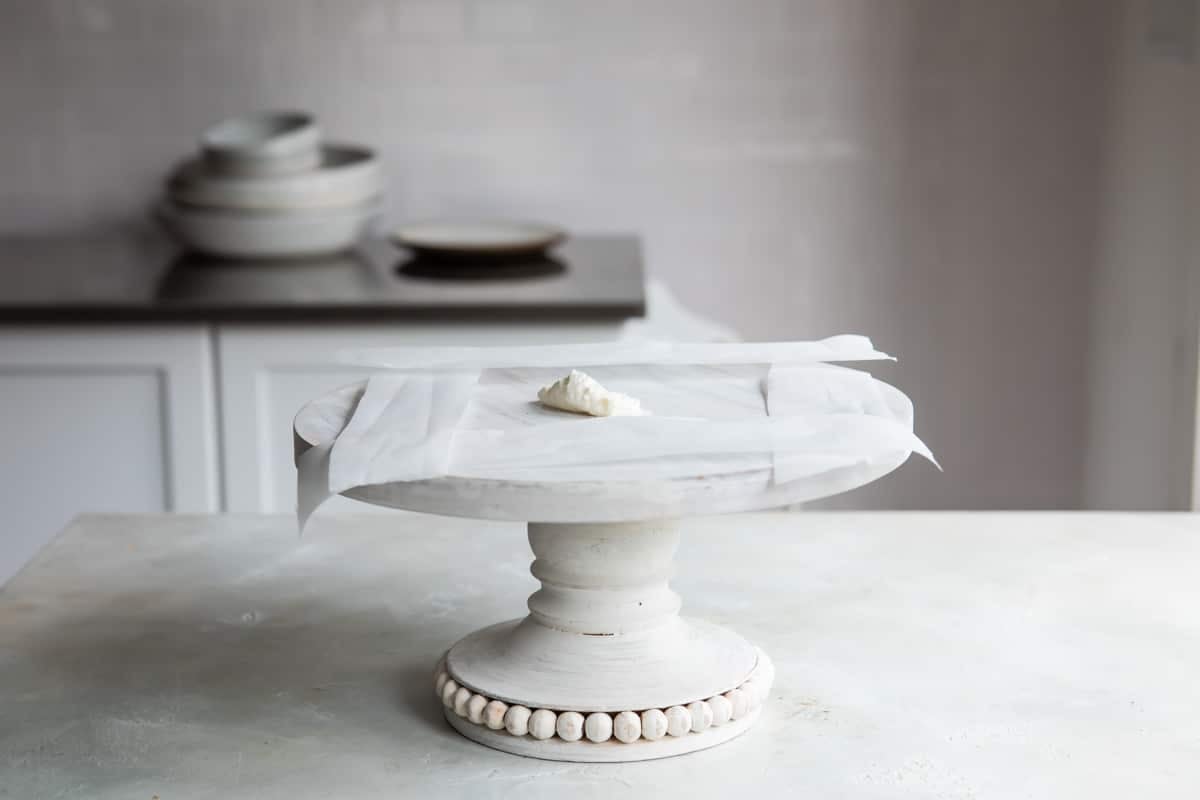
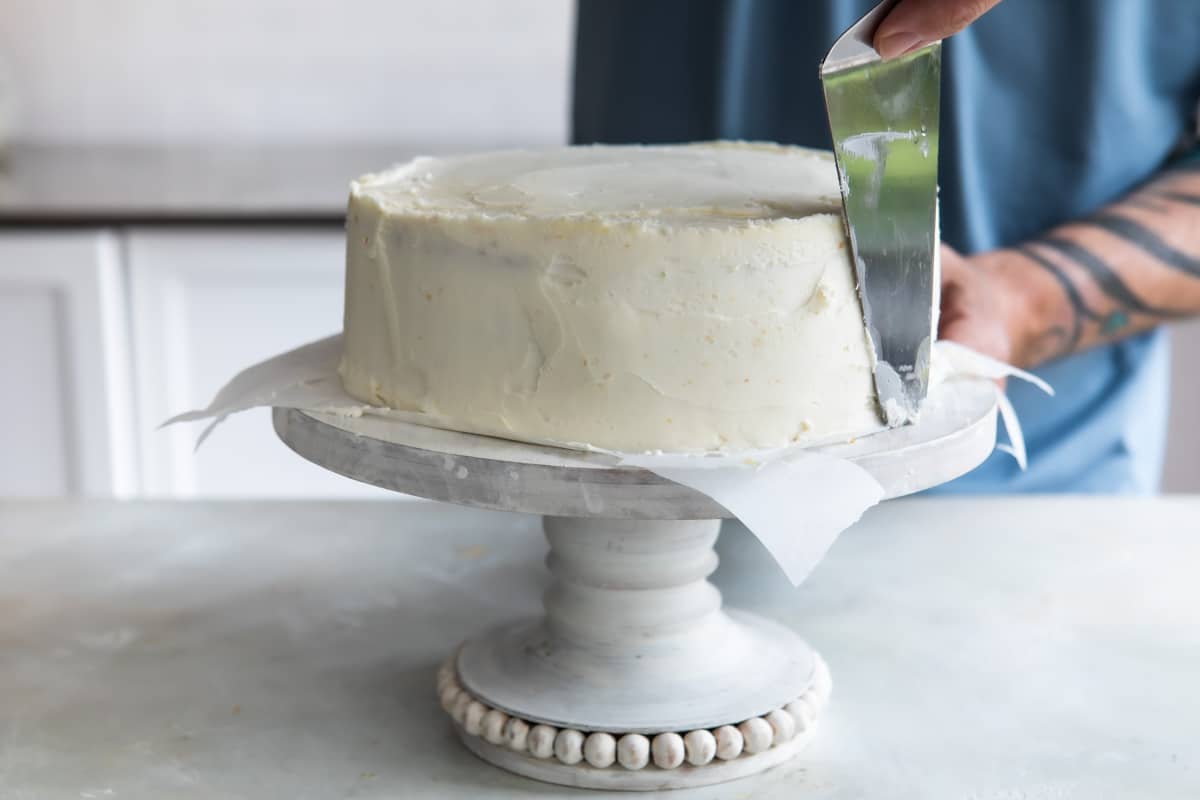
- Cover the edges of a cake platter with strips of parchment paper to help keep it clean. Slide the pieces of parchment out from under the cake once the frosting job is done.
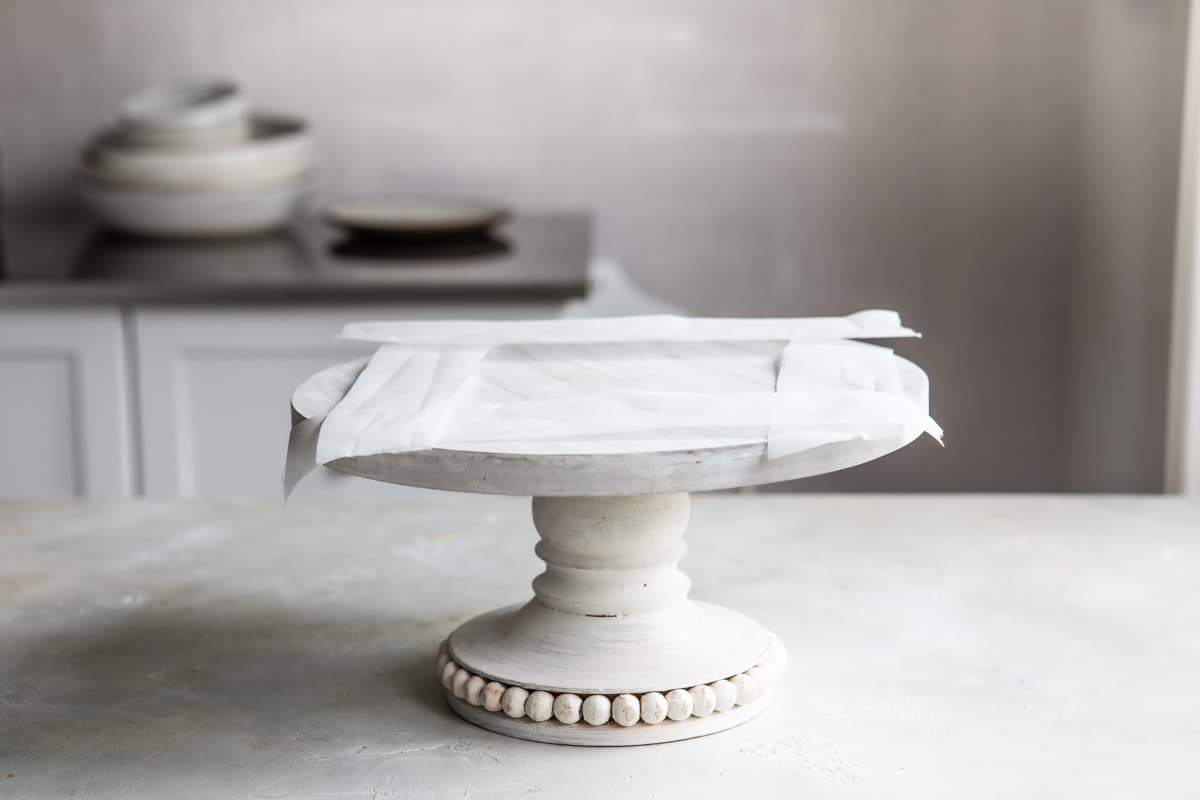
- Dollop a small amount of frosting in the center of the platter to help anchor the bottom of the cake to the platter (so it doesn’t slide around as you frost it).
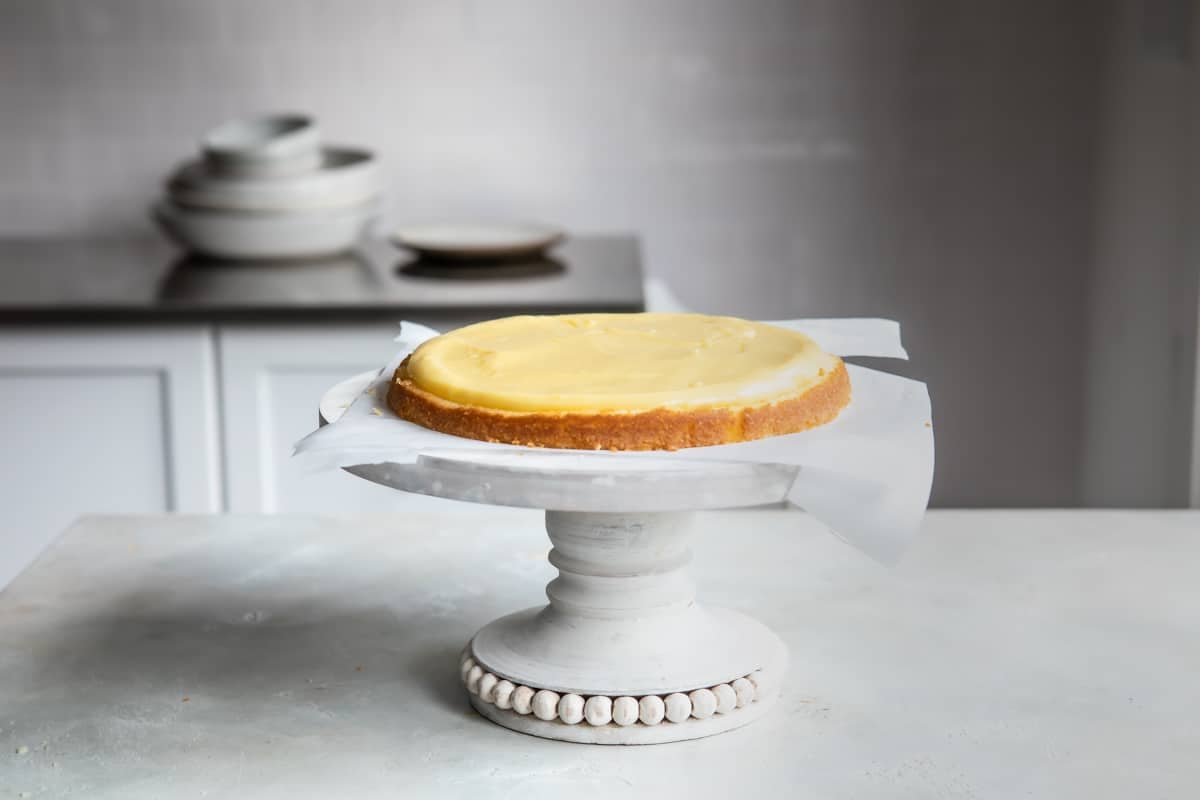
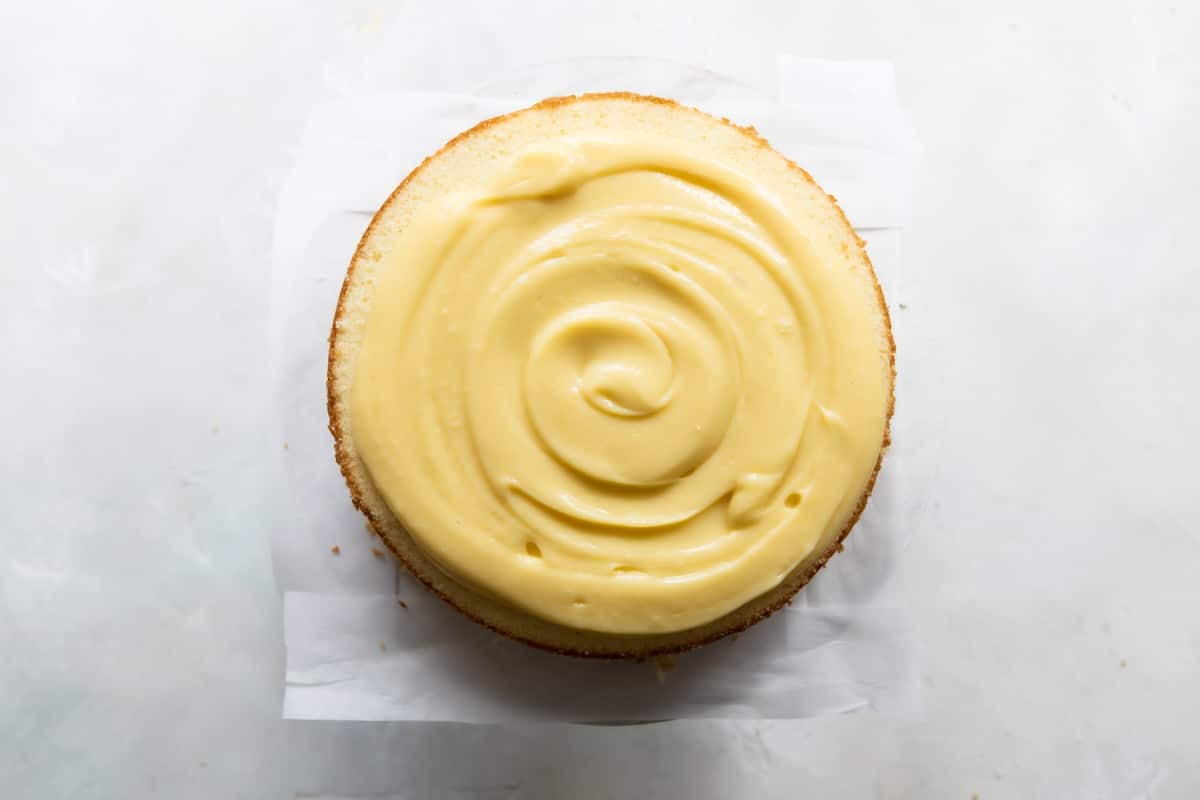
- Add one layer of cake to the serving platter. Add ¾ cup of the pastry cream to the center of the cake and spread in an even layer to the edge.
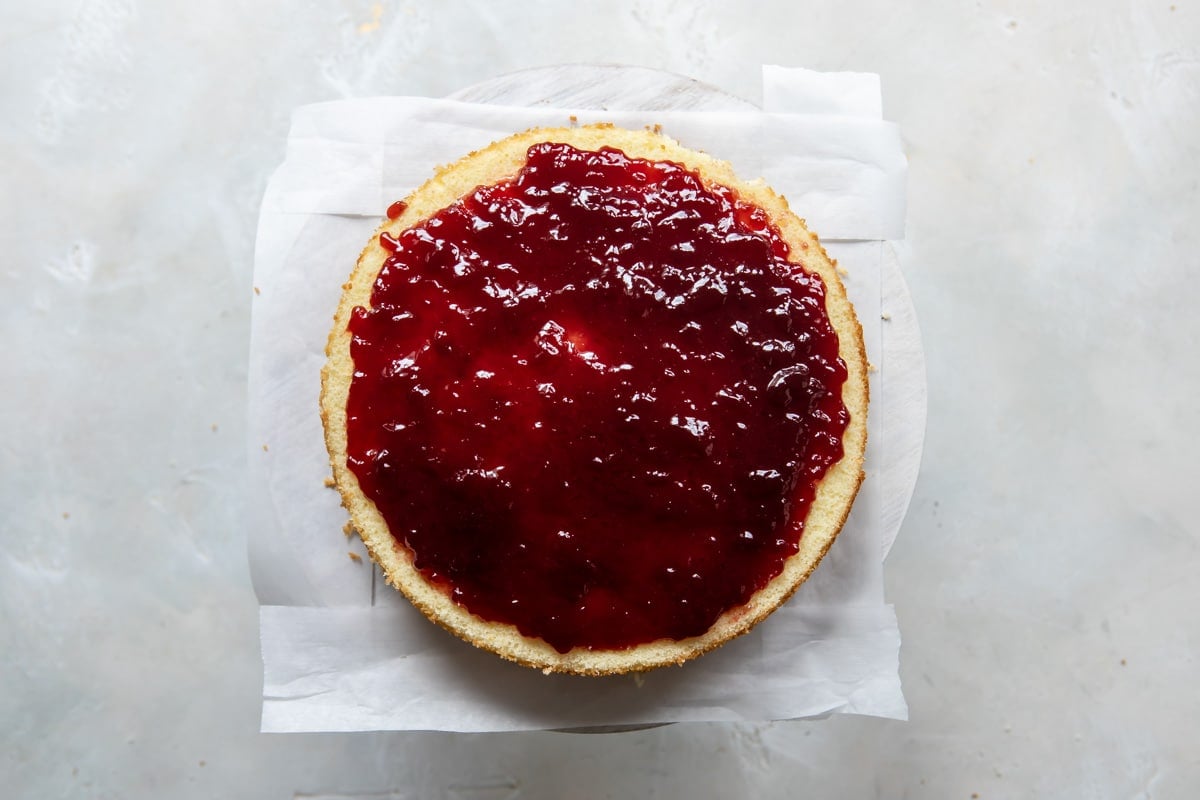
- Align a second layer of cake over the first and top with 1 cup raspberry jam, spreading in an even layer to the edge.
- Add a third layer of cake and top with ¾ cup of pastry cream in the center, spreading in an even layer to the edge.
- Top with the last layer of cake.
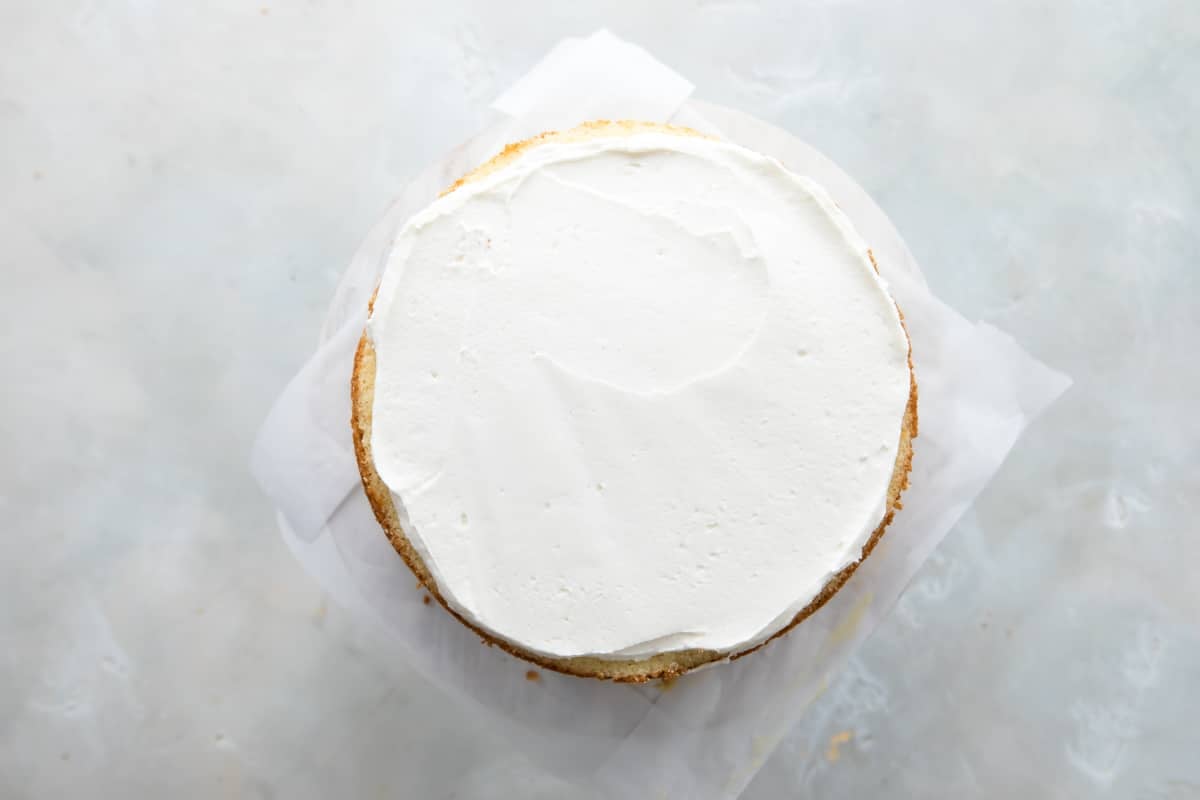
- Brush away any large crumbs, dollop frosting in the center, and spread lightly to the edges.
- To frost the sides, gather a few tablespoons of frosting on to the tip of the spatula, then gently spread it onto the side of the cake. Use gentle motions and don’t press too hard or you will end up with crumbs in the frosting. Clean the spatula as needed.
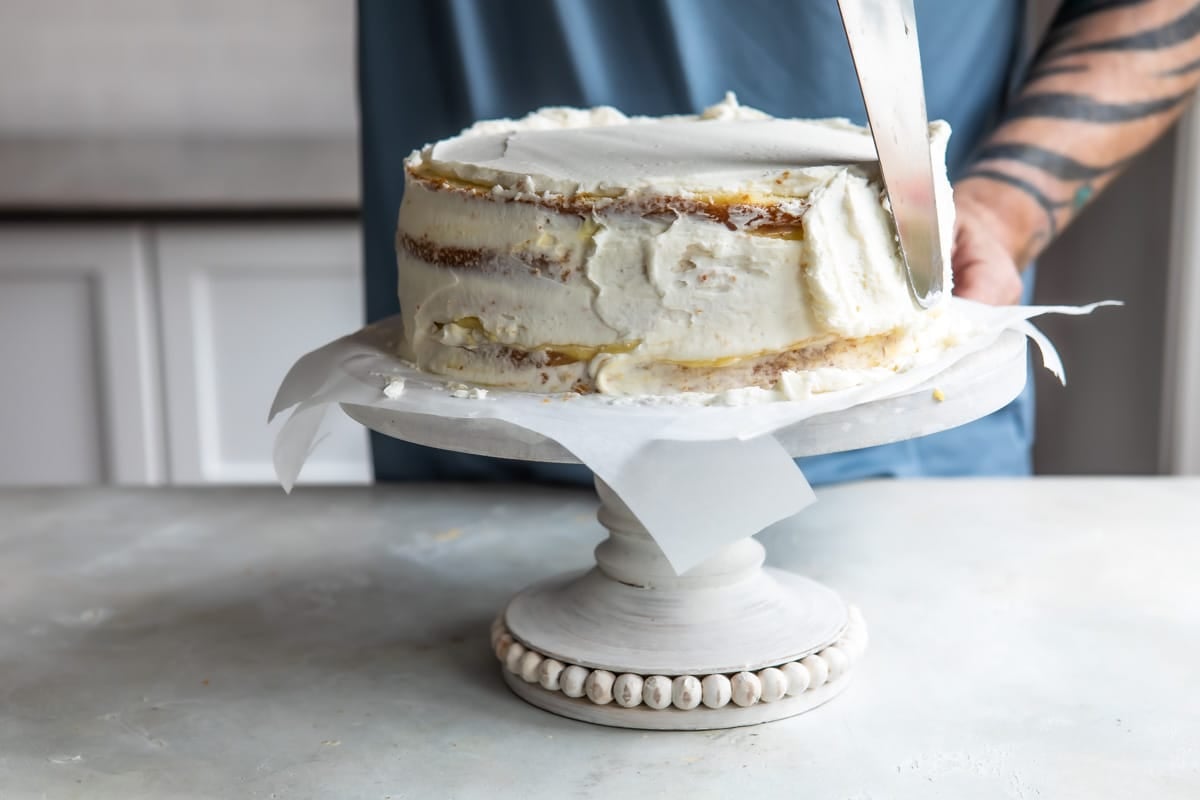
- Gently run the edge of the spatula around the sides to smooth out any bumps and tidy the area where the frosting merges between the sides and the top.
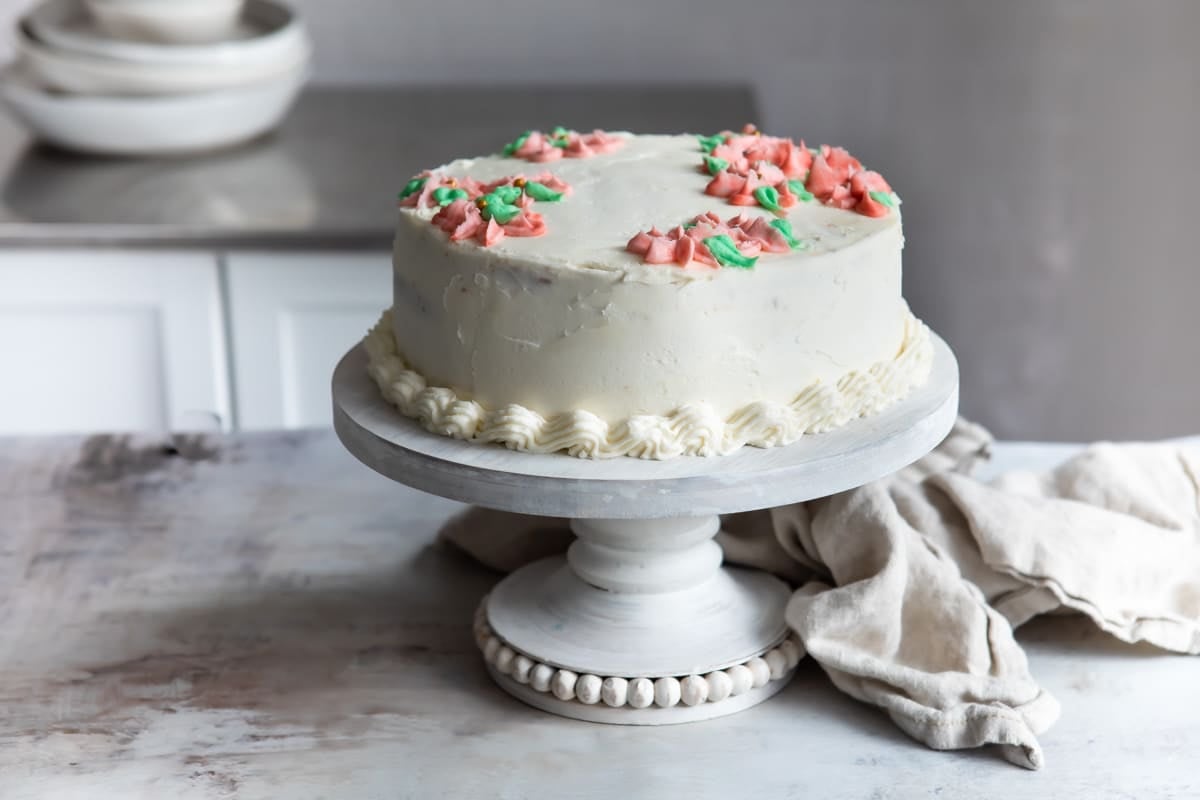
- Decorate the cake as desired with more frosting or some fresh raspberries. Store leftovers in the refrigerator.
Recipe tips and variations
- Yield: This recipes makes 1 spectacular 4-layer Danish Layer Cake. 1 cake serves 12 (or more or less depending on how you slice it).
- Storage: Store leftover cake in the refrigerator for up to 4 days.
- Make ahead: The pastry cream can be made up to 3 days in advance; whisk to recombine before using. The cake layers can be baked in advance. Cool to room temperature, then wrap tightly in a double layer of plastic wrap, and freeze for up to 3 months. Thaw overnight at room temperature. The vanilla buttercream can be made up to a week in advance; store covered in the refrigerator.
- Freezer: The entire assembled, frosted cake can be frozen for up to 3 months. Thaw for 24 hours in the refrigerator.
- Semi-homemade: I grew up with a not-so-homemade version of Danish Layer Cake, and it was the cake I requested every year for my birthday. It’s delicious and much easier than the from-scratch version below. To make my mom’s version:
- Substitute a boxed yellow cake (prepared according to package directions for 2 (8-inch) cakes) for the from-scratch vanilla cake.
- Substitute a (3.4 ounce) box instant vanilla pudding for the pastry cream. Ignore the package directiosn and make the pudding with 2 cups cold milk (chill at least 10 minutes to set).
- Substitute 16 ounces frozen whipped topping, thawed, for the vanilla buttercream frosting.
Recipe FAQs
Yes, it does. Danish Layer Cake is made with pastry cream and raspberry jelly, and those are highly-perishable ingredients that need to be kept chilled.
The entire assembled, frosted Danish Layer Cake can be frozen for up to 3 months. Thaw for 24 hours in the refrigerator.
Order handmade Danish Layer Cakes to be shipped throughout the USA from O&H Bakery in Racine, Wisconsin. They also have the best kringles, too!
More Wisconsin favorites

Entertaining
Friday Night Fish Fry

Cocktail Recipes
Brandy Old Fashioned

Appetizer Recipes
Fried Cheese Curds

Entertaining
Midwest Charcuterie Board
Join Us
Danish Layer Cake (Dansk Lagekage)
Equipment
- 2 8-inch cake pans (see note 1)
Ingredients
For the pastry cream:
- 2 cups milk
- 1 cup granulated sugar
- 6 egg yolks
- 1/4 cup cornstarch
- 1/4 teaspoon salt
- 1 teaspoon vanilla extract
For the yellow cake:
- 1/2 cup whole milk at room temperature (see note 2)
- 4 eggs at room temperature
- 2 teaspoons vanilla extract
- 1 3/4 cups cake flour (7 ounces)
- 1 1/2 cups granulated sugar (10 ½ ounces)
- 2 teaspoons baking powder
- 3/4 teaspoon Salt
- 1 cup unsalted butter cut into tablespoons and softened (2 sticks)
For the buttercream frosting:
- 1 cup butter softened (2 sticks)
- 4 to 5 cups powdered sugar
- 2 teaspoons vanilla extract
- 1/4 cup heavy cream
- Pinch Salt optional
To assemble the cake:
- 1 small jar seedless raspberry jam (see note 3)
- raspberries for garnish optional
Instructions
To make the pastry cream:
- In a medium non-aluminum saucepan over medium heat, warm milk until tiny bubbles appear on the surface, about 6 to 8 minutes (about 180 degrees Fahrenheit/82 degrees Celsius).
- Meanwhile, In a large bowl, whisk together egg yolks and sugar. Whisk in cornstarch and salt.
- While whisking constantly, pour in half of the hot milk. Whisk in remaining hot milk and return to saucepan.
- Cook over medium heat, whisking constantly, until the mixture thickens to a firm consistency, about 5 to 8 minutes. Whisk in vanilla. Scrape in to a bowl.
- Cover with plastic wrap, pressing it directly on to the surface of the pastry cream. Refrigerate until chilled, about 2 to 3 hours. (Note: You will have just over 2 cups of pastry cream and you only need about 1 ½ cups for this recipe.)
To make the cake:
- Preheat oven to 350 degrees. Grease and flour 2 (8-inch) round cake pans, then line parchment paper. In a small bowl, whisk together milk, eggs, and vanilla. Set aside.
- In the bowl of a stand mixer fit with the whisk attachment, beat together flour, sugar, baking powder, and salt.
- With the mixer on medium-low speed, beat the butter in to the flour mixture one piece at a time. Continue beating until the mixture resembles moist crumbs, 1 to 3 minutes total.
- Add the milk mixture to the mixer and beat until light and fluffy, 1 to 3 minutes longer. Stir by hand with a rubber spatula to make sure the batter is fully combined.
- Divide the batter evenly between both pans, gently tapping the pans on the counter to settle the batter. Bake until a toothpick inserted in the center of the cake comes out dry with a few crumbs attached, 20 to 25 minutes. Rotate the pans halfway through baking time.
- Cool the cakes in the pans for 10 minutes. Run a small sharp knife around the inside of each pan to loosen, then flip the cakes on to a wire rack. Peel off the parchment paper, then flip the cakes right side up to cool completely, about 2 hours.
To make the frosting:
- In a stand mixer fit with the paddle attachment, cream butter until pale and fluffy, about 3 minutes.
- Reduce mixer speed to low. Add 4 cups powdered sugar, cream, vanilla, and salt (if using). Continue mixing 2 to 3 minutes longer. If the frosting seems too soft, add the remaining powdered sugar 2 tablespoons at a time.
- Cover and refrigerate the frosting until assembling the cake, up to 1 week in advance.
To assemble the cake:
- Slice off any domed tops of your cake to ensure they are flat. Cut each cooled cake in half lengthwise so there are four layers of cake total.
- Cover the edges of a cake platter with strips of parchment paper to help keep it clean. Slide the pieces of parchment out from under the cake once the frosting job is done.
- Dollop a small amount of frosting in the center of the platter to help anchor the bottom of the cake to the platter (so it doesn't slide around as you frost it).
- Add one layer of cake to the serving platter. Add ¾ cup of the pastry cream to the center of the cake and spread in an even layer to the edge. Align a second layer of cake over the first and top with 1 cup raspberry jam, spreading in an even layer to the edge.
- Add a third layer of cake and top with ¾ cup of pastry cream in the center, spreading in an even layer to the edge. Top with the last layer of cake. Brush away any large crumbs, dollop frosting in the center, and spread lightly to the edges.
- To frost the sides, gather a few tablespoons of frosting on to the tip of the spatula, then gently spread it onto the side of the cake. Use gentle motions and don't press too hard or you will end up with crumbs in the frosting. Clean the spatula as needed.
- Gently run the edge of the spatula around the sides to smooth out any bumps and tidy the area where the frosting merges between the sides and the top.
- Decorate the cake as desired with more frosting or some fresh raspberries. Store leftovers in the refrigerator.
Recipe Video
Notes
- 8-inch cake pans: Do not substitute 9-inch cake pans.
- Whole milk: Do not substitute low-fat milk for the whole milk in the vanilla cake.
- Seedless raspberry jam: If you cannot track this down, raspberry jam with seeds, or another seedless jam, may be substituted. Strawberry seedless jam tastes great in this cake.
- Yield: This recipes makes 1 spectacular 4-layer Danish Layer Cake. 1 cake serves 12 (or more or less depending on how you slice it).
- Storage: Store leftover cake in the refrigerator for up to 4 days.
- Make ahead: The pastry cream can be made up to 3 days in advance; whisk to recombine before using. The cake layers can be baked in advance. Cool to room temperature, then wrap tightly in a double layer of plastic wrap, and freeze for up to 3 months. Thaw overnight at room temperature. The vanilla buttercream can be made up to a week in advance; store covered in the refrigerator.
- Freezer: The entire assembled, frosted cake can be frozen for up to 3 months. Thaw for 24 hours in the refrigerator.
My birthday is in a couple weeks and I just learned my mom (from Racine originally) ordered a DLC from O& H to be shipped here to St Louis for our birthday dinner! Can’t wait!
I just made this cake for my and my son’s birthday. Everything turned out delicious! I had never made it before, but followed all your instructions and was so happy with how it all turned out. The only thing I can criticize is that I personally think this cake doesn’t need the buttercream icing. To me it pushes the sweetness too far. After the fact, I realized that buttercream is not the traditional icing for this cake? I wish the recipe had followed the traditional icing because I think that would have been better balanced. When I make it again, I will use that instead. Your buttercream recipe was great – just too sweet for this cake in my opinion (that’s the only reason I’m giving 4/5 stars).
Yes I saw! That’s awesome. Who knows…maybe I know them lol. Baked the cake just now (need to assemble, but I’m sure it’ll be lovely) and used your recipe and it turned out great. Sad I can’t eat it (I’ll have to make it again for me.).
So funny thing. I am completely obsessed with Danish Layer Cake, but haven’t really made it in years and wanted to do it right. I came upon your recipe because I was looking for what type of cake (yellow) is typically used because I wasn’t sure if I’d forgotten. Of course, I started reading your post first…so I have to comment…I’m from Racine, Wisconsin (displaced by military life…Air Force husband) and O&H is the BEST (I literally just got a holiday catalog from them and was drooling over all the things I hope someone sends me for Christmas this year.). Perhaps this is why I love Danish Layer Cake so much.
Anyway, I thought that was awesome. I’m planning to bake a quick cake for a baked goods fundraiser at church tomorrow and Danish Layer Cake was the best thing that came to mind 🙂 I’m making mine with seedless strawberry jam and fresh strawberries (because that’s what I had in my cabinet) and buttercream from our grocery store bakery (because I had to cheat a little bit lol).
Hi Alyssa! This is fantastic! I can’t remember if I put this in my post or not (and clearly I’m too lazy to look) but my grandma is from Racine originally and so is my husband’s family (they still live there). So I hang out in Racine periodically, and obviously I always go to O&H Bakery! It’s the best! I’m so excited that you found the recipe and that it sounds good to you. Everyone at church is going to be excited, I have no doubt. Strawberry jam sounds fantastic too… thank you so much for the lovely, thoughtful comment! Thank you so much. Made my day.
There is nothing better than a Danish Layer Cake from O & H! They make the best frosting–not that greasy sweet stuff most bakeries use. Please, please don’t tell your readers that subbing instant pudding and cool whip will result in a Danish layer cake–Yikes! It has to be be homemade buttercream, at the very least. eVen if you’re not a baker, make the frosting. It is the perfect birthday cake!
Hi Ellen, I wish I could tell people how to bake, ha ha! I only have that in there because that’s how my family makes it, and if they ever visit my blog for the recipe, I want them to know how to proceed. It’s not authentic that way, but I know my family. Nothing I can say would make certain people make real frosting. I am a culinary school student myself and I know shortcuts are not the way to the best food, but you can’t teach an old dog new tricks! Thanks.
We actually never use buttercream in Danish layer cakes. Usually we use a combination of pastry cream and unsweetened whipped cream + some fresh fruit. And then we decorate with whipped cream, fruit and chocolate. Most importantly, the ratios are different than American layer cakes. The cake layers are thin and the fillings are piled high 🙂
Few days to late for my birthday 🙁 but keeping it for next year. Promising ingredients ! Great photos ! Thank you so much !
It tastes even better if you bake your own cake layers instead of using a mix and then whip your own cream to go on top! Decorate with strawberries (we use strawberry jam in the layers instead of raspberry) or chocolate shavings on top and it is wonderful! At least that how we always make it in Denmark 😉
Malene, this is actually REALLY great feedback for me! My mom always called it Danish Layer Cake but I wondered if anyone in Denmark actually made it… or if it was just vaguely similar that we Americans ruined along the way. 🙂 Which actually we kind of did with the cake mix and the cool whip, but now I know better. So, I can’t wait to try your version (completely from scratch and with strawberry jam). Thank you so much for this insight into the real deal!
This is not the comment you might be expecting but you are the only person I know of that shares a birthday with a brother, 2 years apart, besides my little brother & I. We looked like twins, have an identical birthmark, & nearly identical birth times except I was born in the morning, he was born in the late afternoon. Sorry, just had to say something. Personally, think it is more fun being a “not twin” as we call ourselves.
Laura, I LOVE THIS STORY! I am so excited to hear it, because I’ve never heard of anyone else who had the same situation as me! And it is totally awesome. I remember when I was little, in elementary school and stuff, it was soooooo cool when they announced our birthdays were on the same day! Or at least I thought it was cool. 🙂 And we had the most EPIC birthday parties – joint sleepovers, so 10 boys and 10 girls in the same house (boys playing basketball in the living room, girls playing dress-up upstairs). It was just so fun. And now that I’ve gone through the whole trying-to-conceive/getting pregnant/having a baby situation myself, I realize how uncanny the timing is. My brother and I don’t look like twins, but it’s awesome that you and your brother do. 🙂 Thank you so much for sharing!!!
Hope you had a great birthday, Meggan! You definitely celebrated in style with this gorgeous cake. I love layer cakes that aren’t too fancy. it’s just too scary if I feel like everything has to be perfect. This seems like a cake that an ordinary person i.e. me can make and it’ll look and taste great.
Never heard of this cake but I love it!
Happy Birthday, Meggan! The cake looks delicious! Kudos to your mom for all those cakes!!
Thanks so much, Heather! I appreciate you stopping by. 😀
You know, growing up in Argentina, this cake was a staple but I didn’t have a name for it (I remember it with the 7-minute frosting as we didn’t have Cool Whipe there). Now I’m gonna have to make it. Thanks for the memory! Happy birthday!
That’s crazy! Who would have thought that this cake would have been in Argentina, but hey why not! People love good cakes everywhere. 😀 I am sure it is much better with 7-minute frosting which is so light and not too sweet – just perfect here! Thanks for sharing your story and for the birthday wishes. Much appreciated!