This post contains affiliate links, which means I may earn a commission if you purchase through those links (at no extra cost to you).
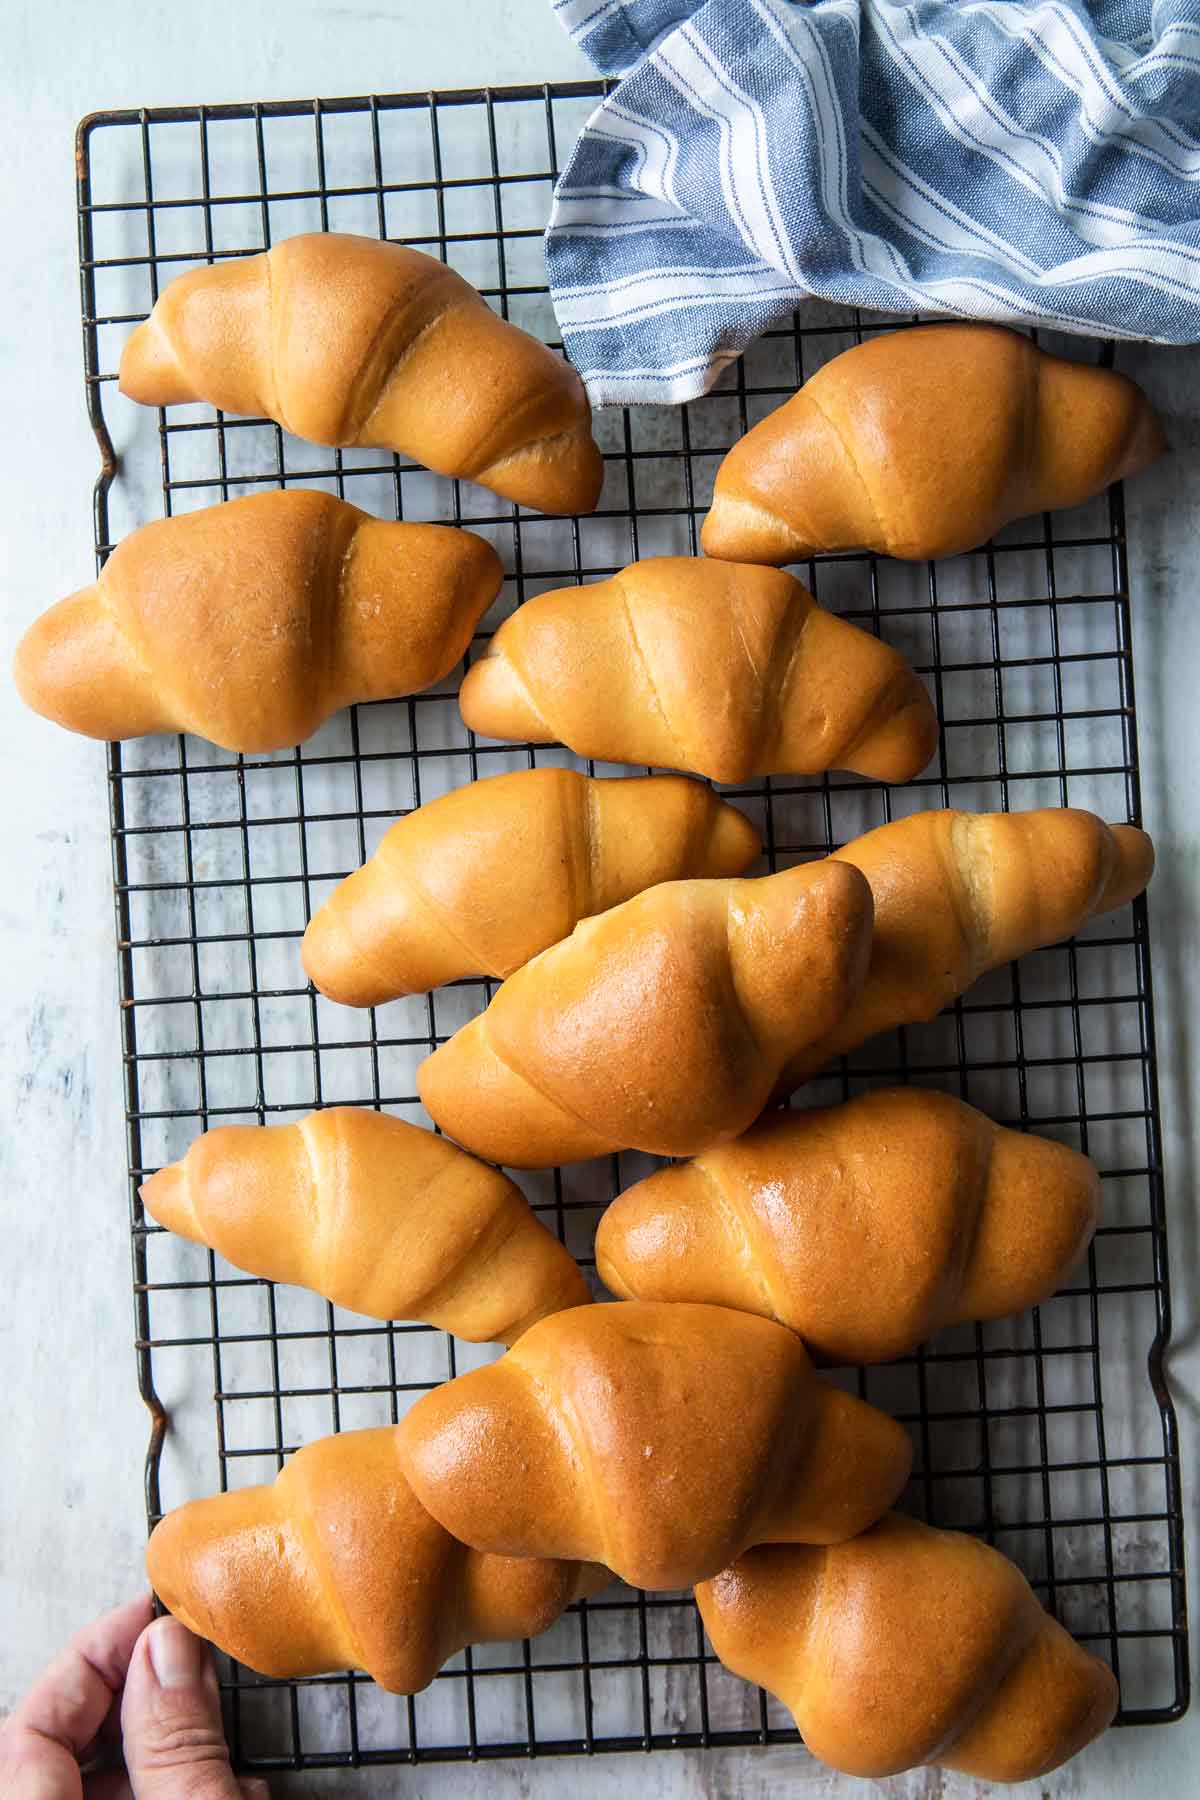
Pillowy soft with a sweet, buttery taste, these Homemade Crescent Rolls are perfect for all the holidays or a weekend baking project. This from-scratch version is light-years ahead of anything you could ever pop out of a can.
Meggan’s notes
Growing up, grandma’s homemade crescent dinner rolls were always a tradition at all the holiday tables. They looked like store-bought crescent rolls but had a superior taste and texture. They are also much easier to make traditional croissants (made by rolling cold butter into layers of dough), so beginning bakers are welcome!
Even the fussiest eaters (hello, children!) can’t resist these homemade rolls. If they eat nothing else on the table, they’ll eat these! These rolls are ideal for Christmas dinner, Easter brunch, Sunday dinner, and everything in between. And even though you brush them with butter at the end, I serve extra butter at the table, too.
Table of Contents
Recipe ingredients

At a Glance: Here is a quick snapshot of what ingredients are in this recipe.
Please see the recipe card below for specific quantities.
Ingredient notes
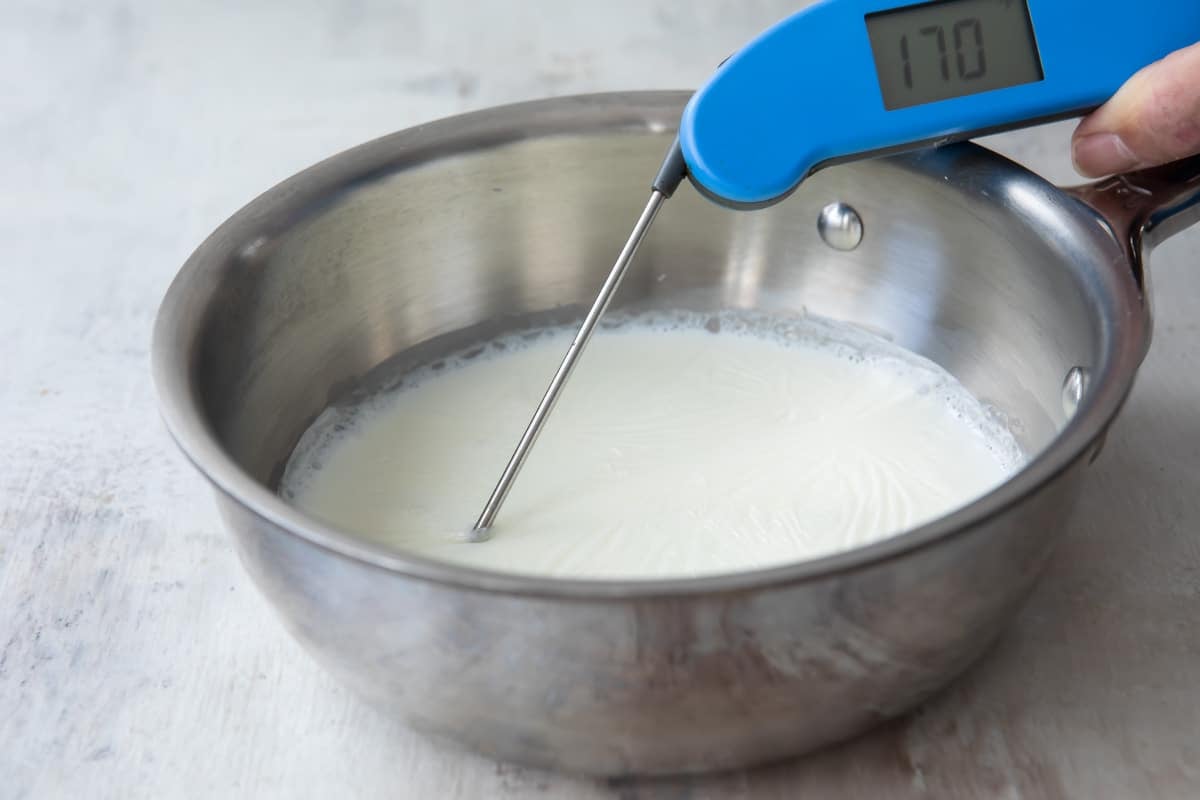
- Milk: Scald the milk around 170 degrees Fahrenheit. However, yeast dies at 138 degrees Fahrenheit, so allow the scalded milk to cool before using.
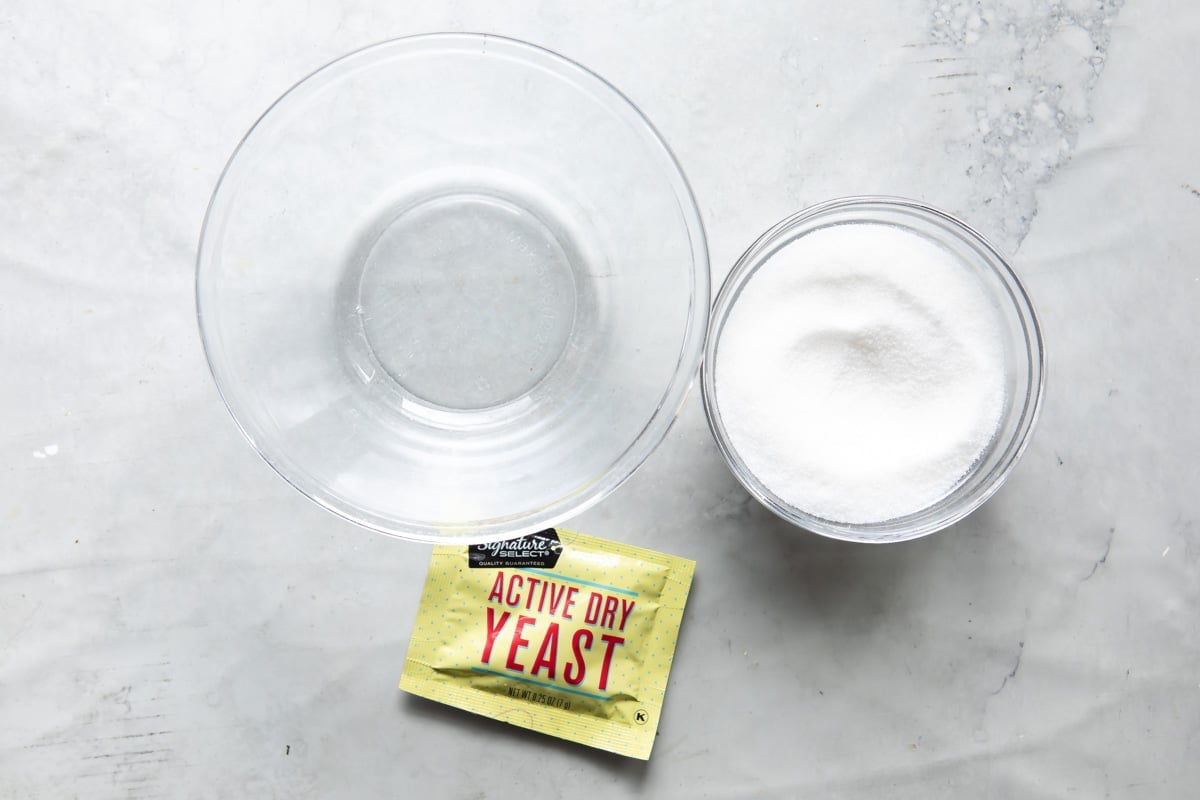
- Yeast: Active dry yeast lies dormant and needs a warm liquid to become “activated.” Store open jars of yeast in the refrigerator for up to 4 months or in the freezer for up to 6 months. Use straight from the freezer (no need to thaw). Unopened packets of yeast can be stored in a cool, dry place.
Step-by-step instructions
- In a small saucepan, bring the milk to a scalding temperature (170 degrees) so a thin skin forms on the surface of the milk. Remove immediately from heat.
- From the ½ cup sugar, reserve 1 tablespoon. Set aside for feeding the yeast in Step 4.
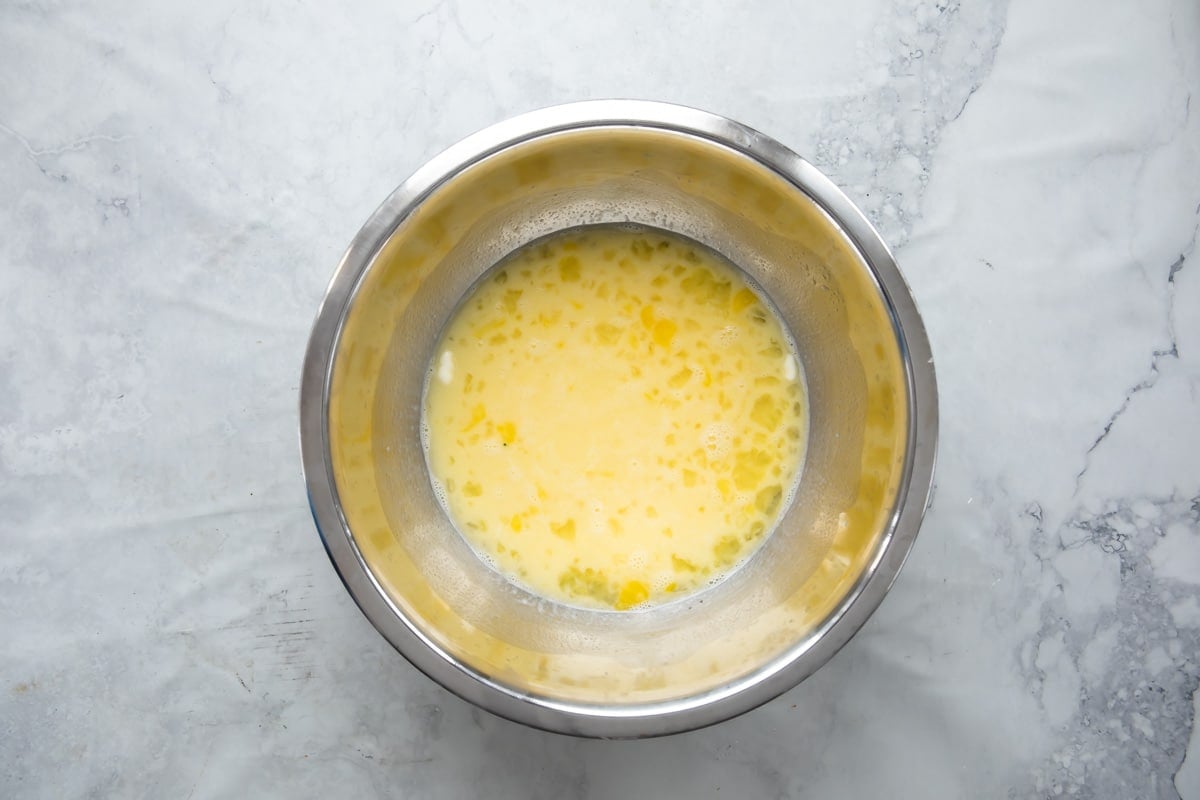
- Combine ⅓ cup butter, remaining sugar (½ cup less 1 tablespoon), and salt in a medium bowl. Pour scalded milk over the top and cool to 110 degrees to 115 degrees, stirring occasionally. Stir in the eggs.
- While the scalded milk mixture is cooling, in the bottom of a glass measuring cup or small bowl, whisk together the ¼ cup warm water (110 degrees), yeast, and reserved tablespoon of sugar. Let the yeast bloom for 5 minutes.

- In the bowl of a stand mixer fitted with the dough hook attachment, combine the dry ingredients: 4 ½ cups flour, yeast, and water. With the motor running on low, slowly drizzle in the scalded milk mixture.
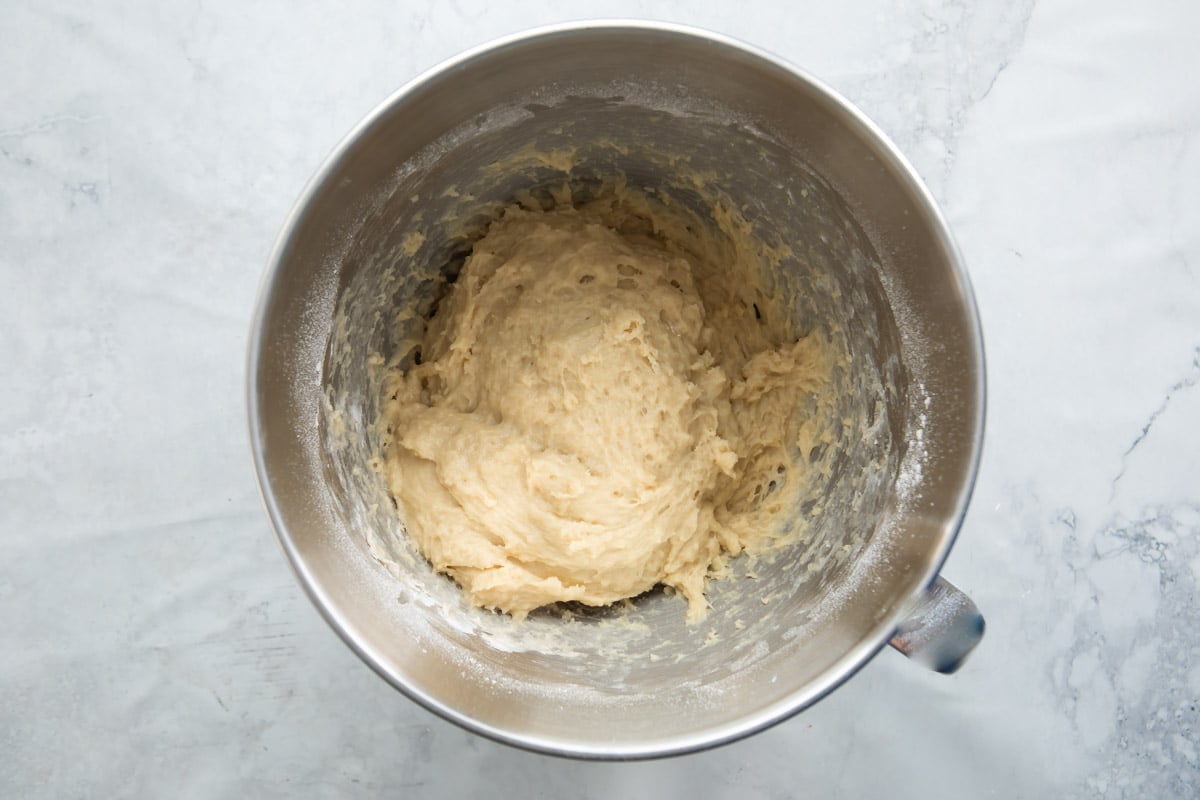
- Increase the mixer speed to medium and mix until shiny and smooth, 6 to 10 minutes. If the crescent roll dough is sticky after 3 minutes, add the remaining ½ cup flour, 1 tablespoon at a time, until the dough comes together. Using a small, microwave-safe dish, melt the remaining butter for 15 to 20 seconds.
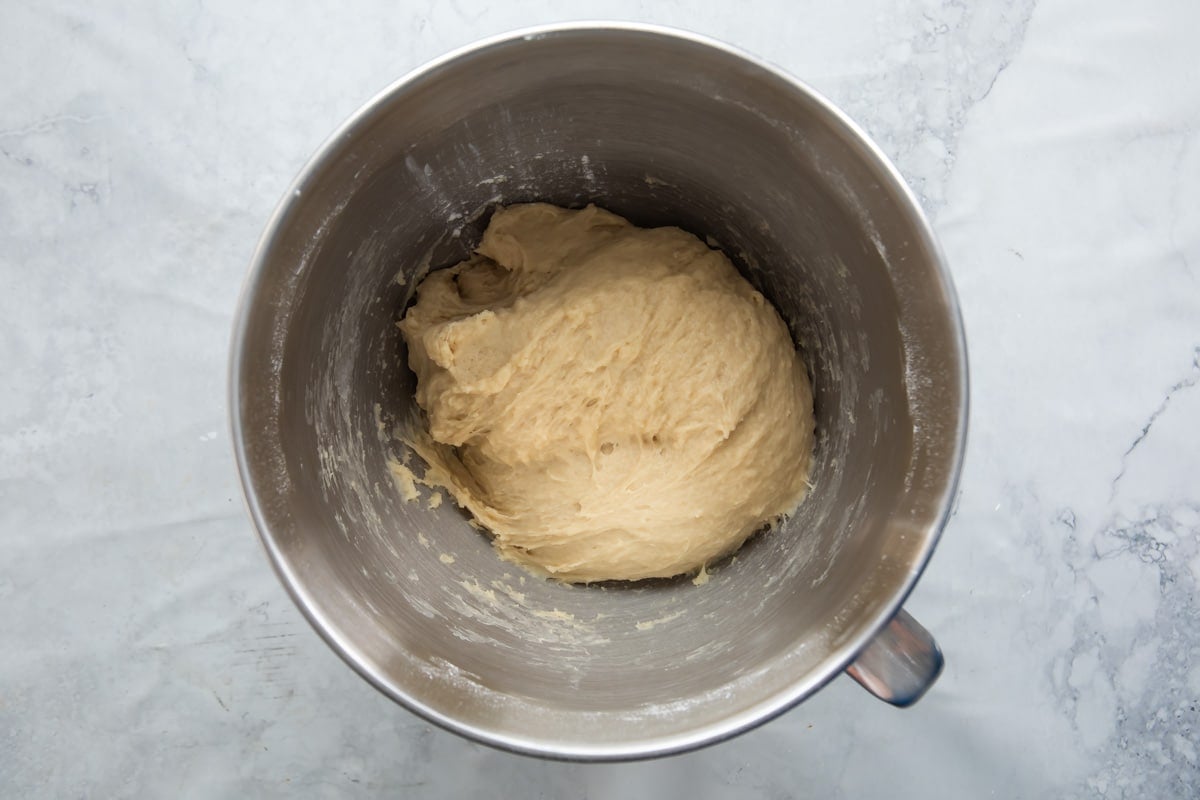
- Turn out the dough onto a heavily floured surface and shape into a ball.

- Place in a greased bowl and brush with 1 teaspoon melted butter.
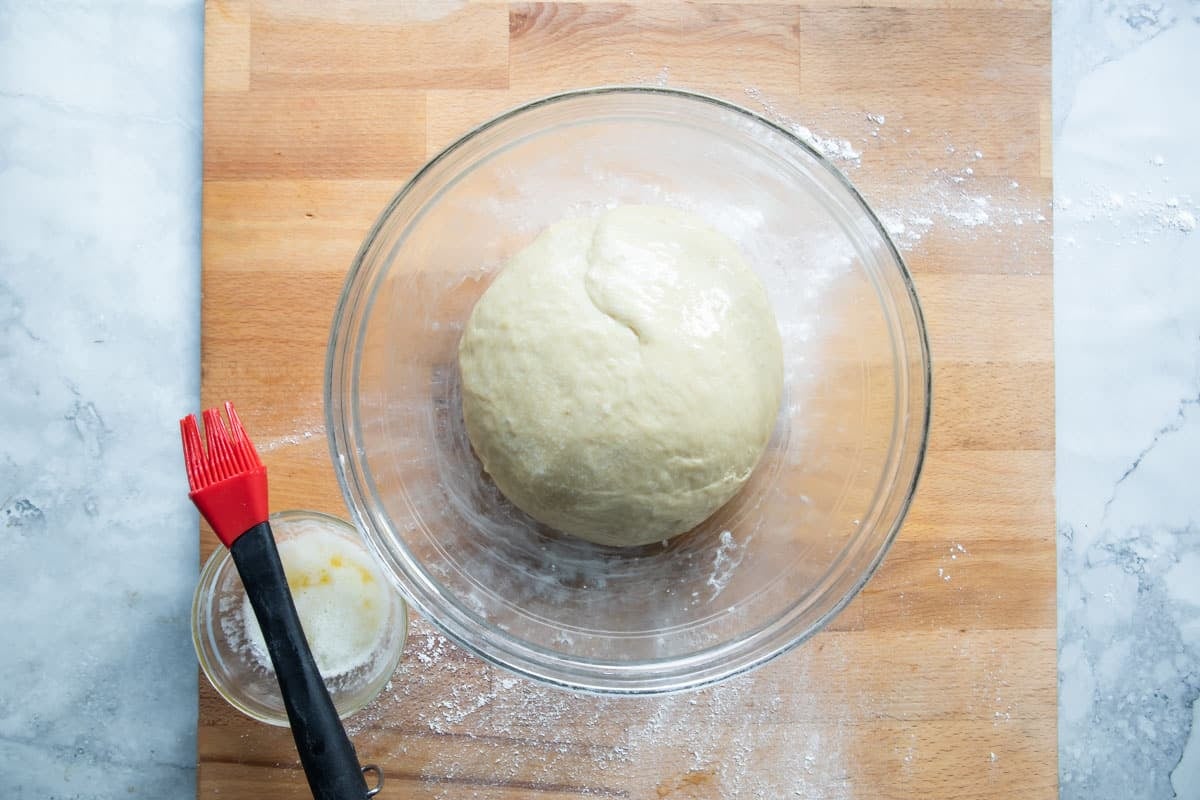
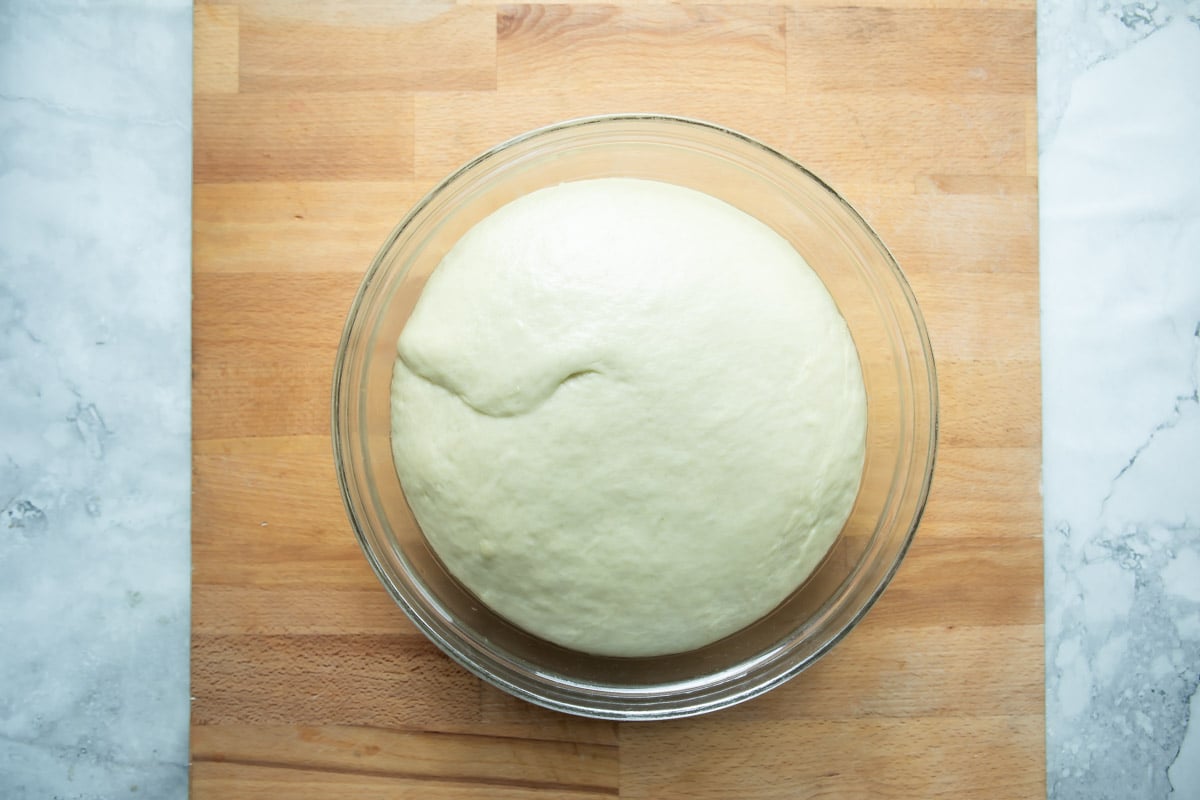
- Cover the bowl with plastic wrap and let rise in a warm place (80 degrees to 85 degrees, see recipe notes) until doubled in volume, about 2 hours.
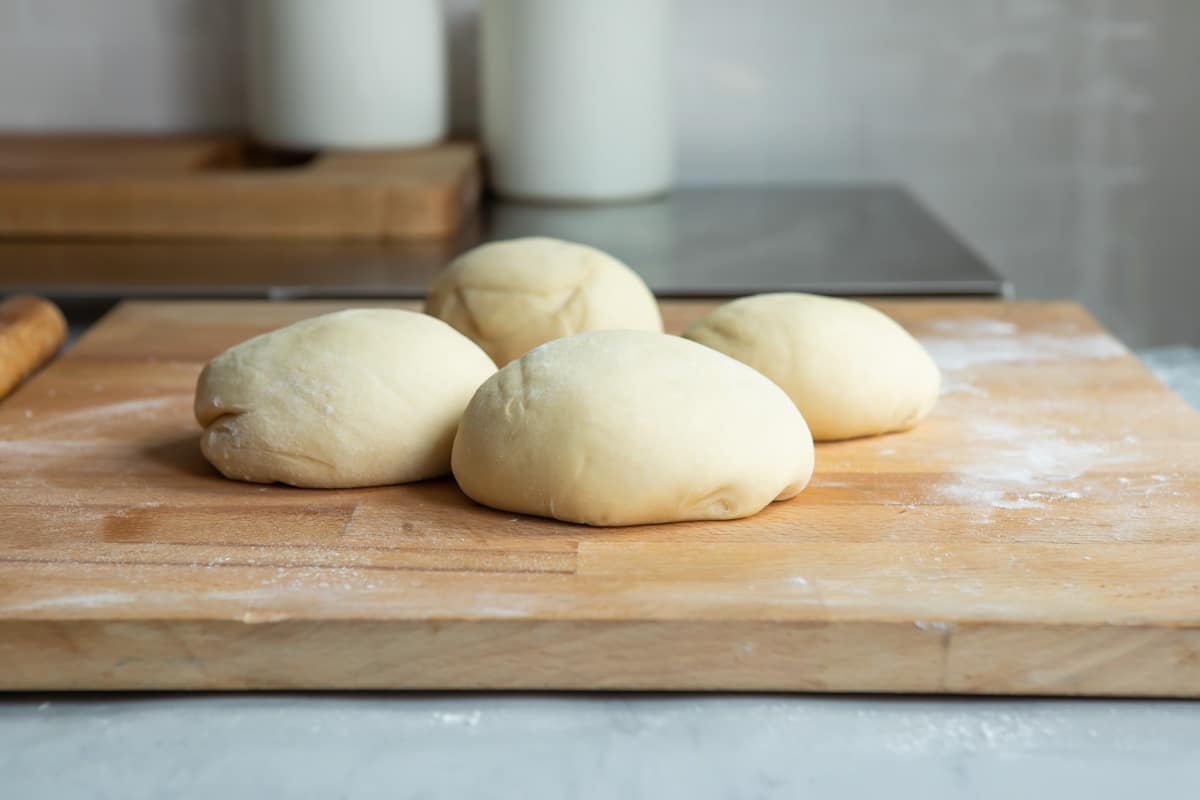
- Coat 3 or 4 baking sheets with parchment paper or nonstick spray. Turn out the dough onto a lightly floured surface and divide into 4 equal portions of dough.
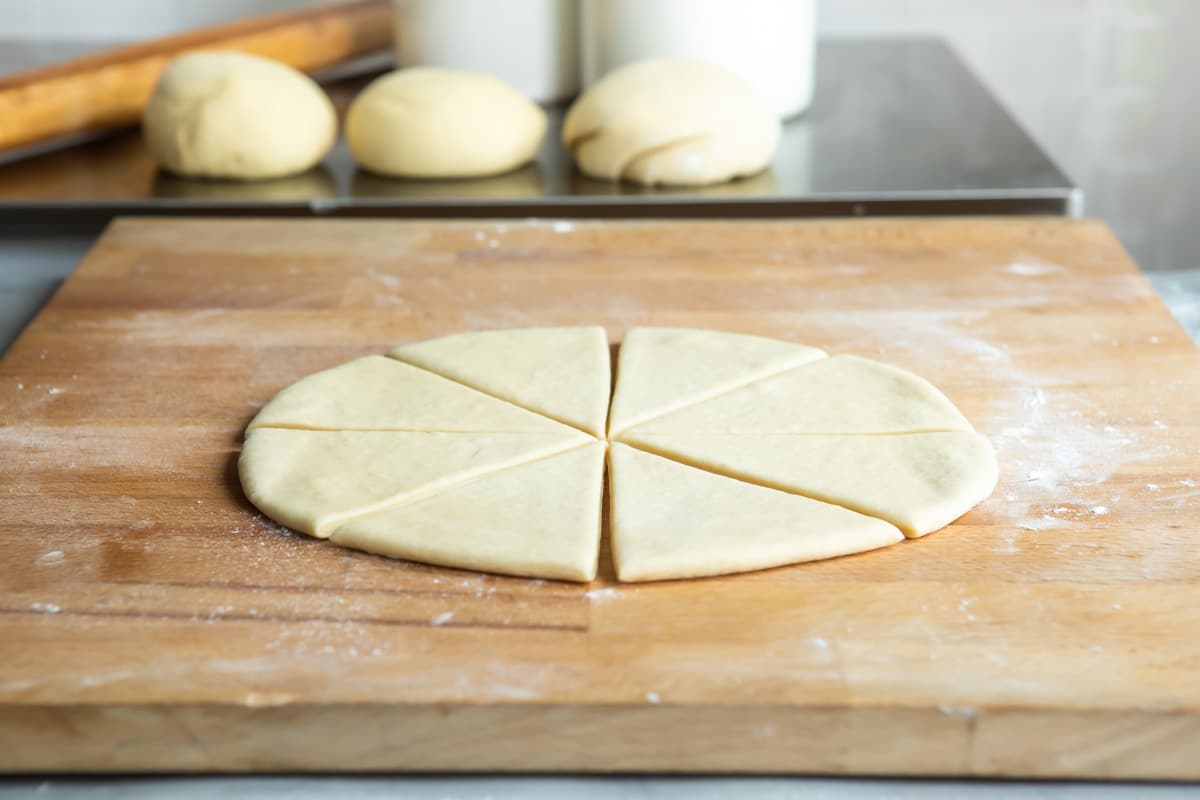
- Working with 1 portion of dough at a time, roll the dough into a 10-inch circle. Using a sharp knife or a pizza cutter, cut each circle into 8 wedges.
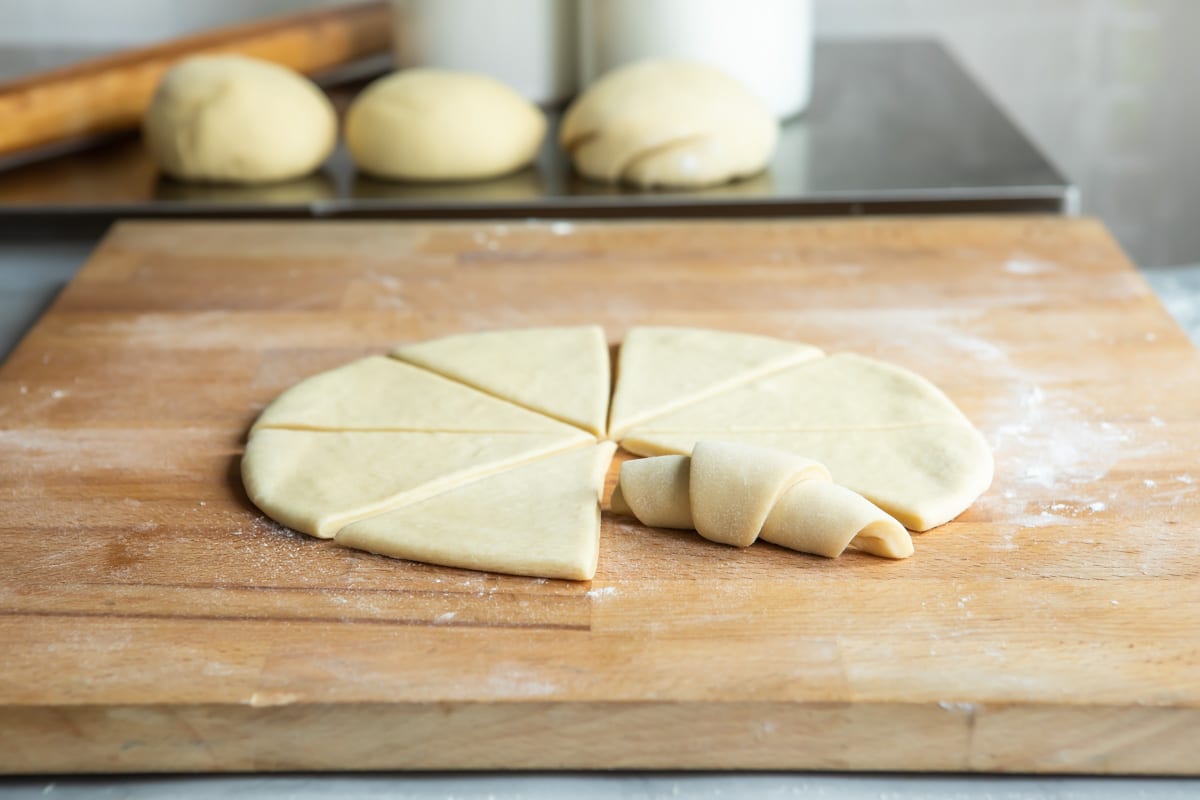
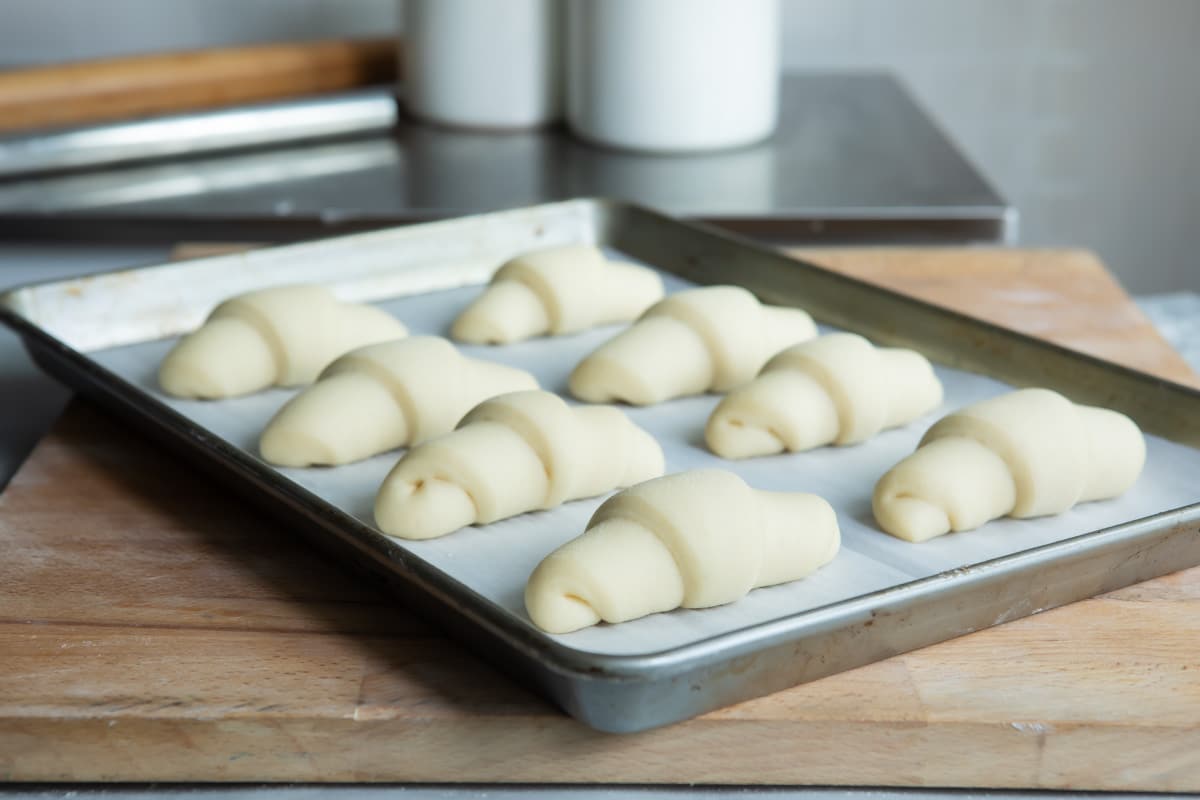
- Starting at the wide end of a wedge, roll up the dough.
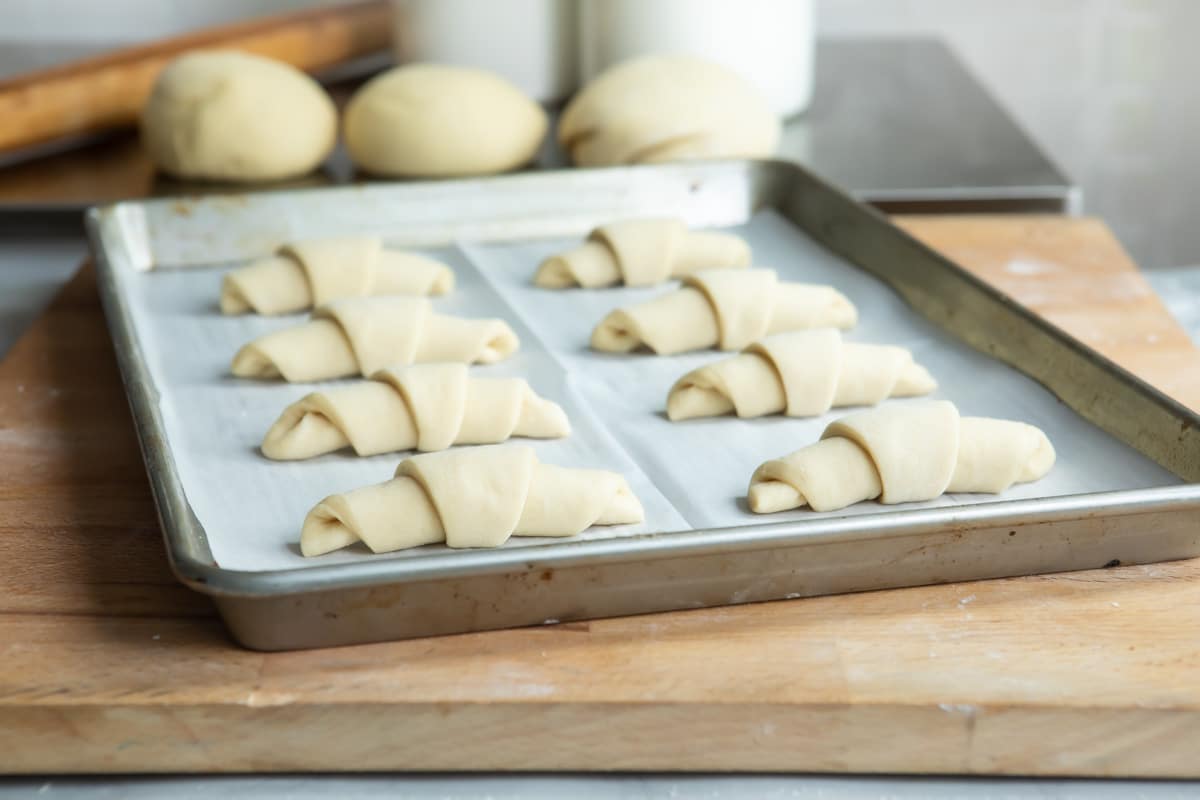
- Place each roll 2 inches apart on the prepared baking sheets with the pointed tip on the bottom. Repeat with remaining wedges and portions of dough.
- Cover the rolls with plastic wrap and let rise in a warm place (80 degrees to 85 degrees) until doubled in size, about 30 to 45 minutes.
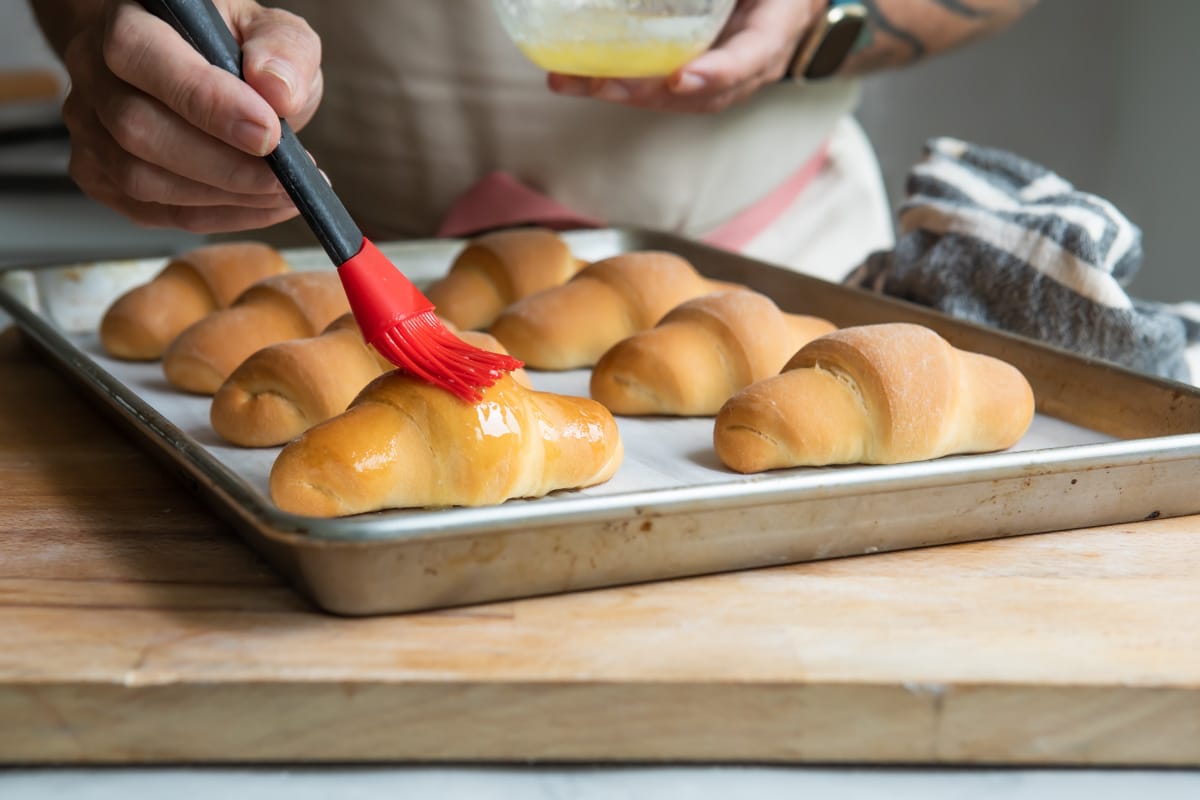
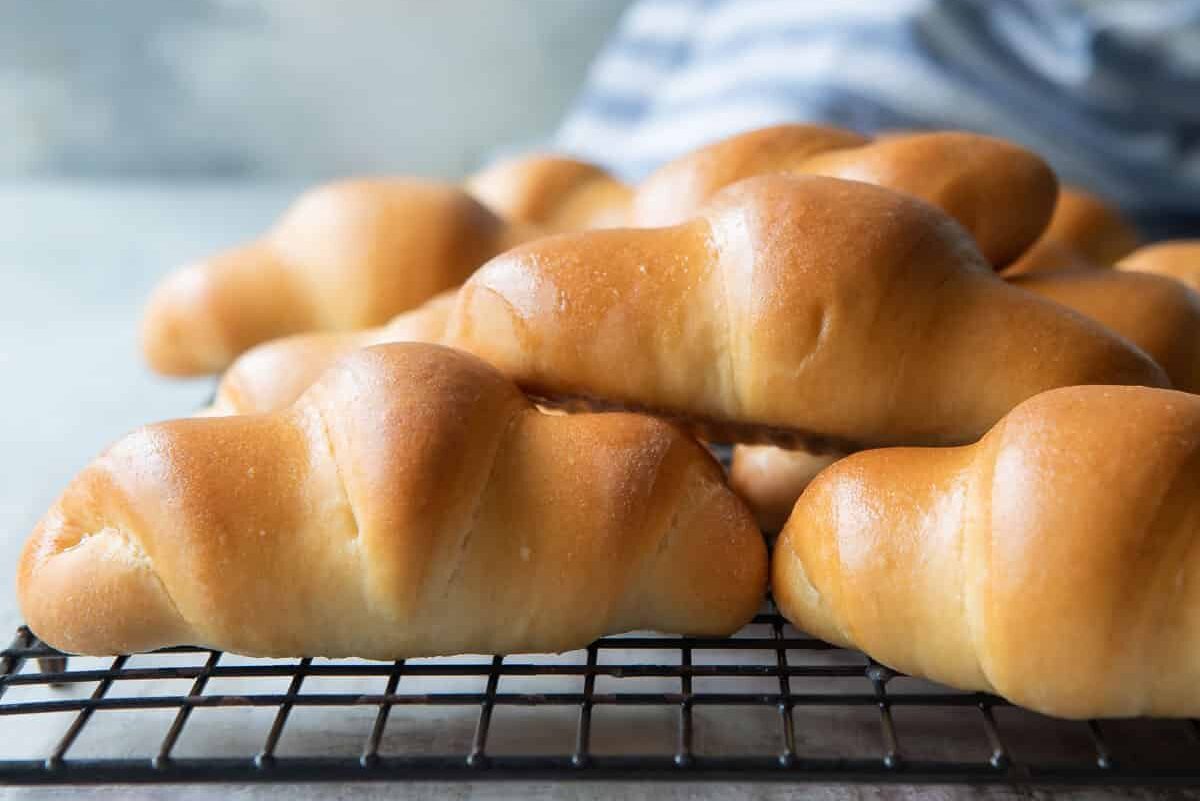
- Meanwhile, preheat the oven to 325 degrees. Bake, 2 sheets at a time, until the rolls are golden brown, about 20 to 25 minutes. Switch the positions and rotate the orientation of the sheets halfway through baking time. Remove from the oven and immediately brush with the remaining melted butter.
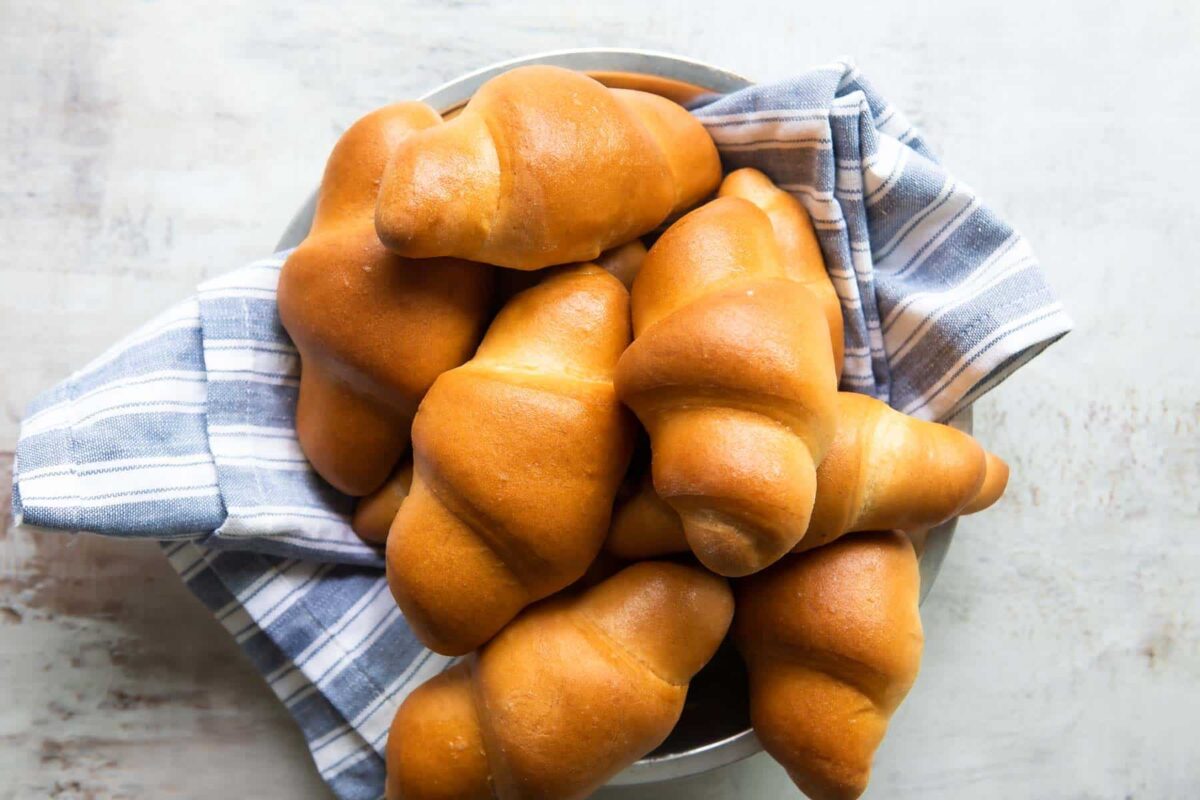
- Serve hot or at room temperature.
Recipe tips and variations
- Yield: This recipe makes 32 rolls. If you have the time, I highly suggest doubling the recipe and freezing extra rolls for future meals.
- Storage: Store cooled rolls in an airtight container for 3 to 4 days at room temperature, or store in the refrigerator for up to a week.
- Freezer: Place on a baking sheet or plate and put in the freezer until frozen solid. Transfer the individually-frozen rolls to a freezer-safe plastic bag, then bag again (I like the double-bag method for best results). Freeze for up to one month. Thaw for 30 minutes at room temperature. To reheat, wrap in foil and warm in a 350-degree oven for 10 to 15 minutes.
- Cinnamon rolls: I used this same dough to make my Homemade Cinnamon Rolls, and they were delicious!
- Pigs in a blanket: Use homemade crescent roll dough for the most epic sausage-filled Pigs in a Blanket ever.
- Garlic rolls: Add fresh cloves of garlic or garlic powder to the melted butter for brushing on at the end. Sprinkle with kosher salt, Parmesan cheese, and fresh parsley if desired.
Frequently Asked Questions
Active dry yeast lies dormant and needs a warm liquid to become “activated.” For best results, use lukewarm water (temperature of 110 to 115 degrees Fahrenheit) and give the yeast 5 to 10 minutes. Adding a little bit of sugar (especially if it’s already in your recipe) feeds the yeast and it will bloom faster.
Here’s my proofing hack I learned from years of living in the Frozen Tundra: Turn your oven on to the lowest temperature it will go, usually 200 degrees. Once it reaches 110 degrees, shut the oven off. Place the dough in the oven and close the door. Opening the oven door will lower the heat a bit, and that’s okay (you’re aiming for 75 to 85 degrees). This works really well in the dead of winter when your kitchen is freezing.
The ingredients and method for making the dough will double perfectly here. However, the baking temperature and time for these rolls assume the baking sheets are cold, not hot. If you add unbaked rolls to a HOT baking sheet (even with parchment), the rolls will cook much faster and will likely have dark brown bottoms. Please keep that in mind! But other than that, the recipe scales perfectly and I almost always make a double batch.
Scalded milk is milk that has been brought to a temperature of 170 degrees, when a “skin” forms on the top.
Delicious dinners to try
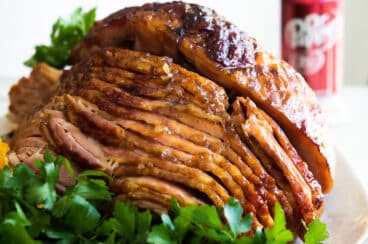
Pork, Ham, and Lamb Recipes
Dr. Pepper Ham

Chicken and Turkey Recipes
Perfect Roast Turkey
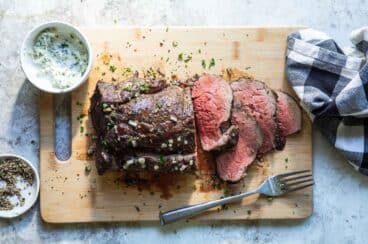
Beef Recipes
Best Beef Tenderloin Roast Recipe

Chicken and Turkey Recipes
How to Make Rotisserie Chicken
Join Us
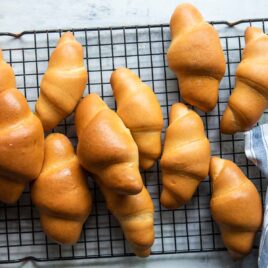
Homemade Crescent Rolls
Ingredients
- 1 cup milk (see note 1)
- 1/2 cup granulated sugar divided
- 1/2 cup butter divided (1 stick)
- 1 1/2 teaspoons Salt
- 2 eggs
- 2 (0.25 ounce) packets active dry yeast (4 ½ teaspoons, see note 2)
- 1/4 cup warm water (110 degrees)
- 4 ½ to 5 cups all-purpose flour
Instructions
- In a small saucepan, bring the milk to a scalding temperature (170 degrees) so a thin skin forms on the surface of the milk. Remove immediately from heat.
- From the ½ cup sugar, reserve 1 tablespoon. Set aside for feeding the yeast in Step 4.
- Combine ⅓ cup butter, remaining sugar (½ cup less 1 tablespoon), and salt in a medium bowl. Pour scalded milk over the top and cool to 110 degrees to 115 degrees, stirring occasionally. Whisk in the eggs.
- While the scalded milk mixture is cooling, in the bottom of a glass measuring cup or small bowl, whisk together the ¼ cup warm water (110 degrees), yeast, and reserved tablespoon of sugar. Let the yeast bloom for 5 minutes.
- In an electric mixer fitted with the dough hook attachment, combine 4 ½ cups flour, yeast, and water. With the motor running on low, slowly drizzle in the scalded milk mixture.
- Increase the mixer speed to medium and mix until shiny and smooth, 6 to 10 minutes. If the dough is sticky after 3 minutes, add the remaining ½ cup flour, 1 tablespoon at a time, until the dough comes together. Using a small, microwave-safe dish, melt the remaining butter for 15 to 20 seconds.
- Turn out the dough onto a heavily floured surface and shape into a ball. Place in a greased bowl and brush with 1 teaspoon melted butter. Cover the bowl with plastic wrap and let rise in a warm place (80 degrees to 85 degrees, see recipe notes) until doubled in volume, about 2 hours.
- Coat 3 or 4 baking sheets with nonstick cooking spray. Turn out the dough onto a lightly floured surface and divide into 4 equal portions of dough. Working with 1 portion of dough at a time, roll the dough into a 10-inch circle. Using a knife or a pizza cutter, cut each circle into 8 wedges.
- Starting at the wide end of a wedge, roll up the dough. Place each roll 2 inches apart on the prepared baking sheets with the pointed tip on the bottom. Repeat with remaining wedges and portions of dough.
- Cover the rolls with plastic wrap and let rise in a warm place (80 degrees to 85 degrees) until doubled in size, about 30 to 45 minutes.
- Meanwhile, preheat the oven to 325 degrees. Bake, 2 sheets at a time, until the rolls are golden brown, about 20 to 25 minutes. Switch the positions and rotate the orientation of the sheets halfway through baking time. Remove from the oven and immediately brush with the remaining melted butter. Serve hot or at room temperature.
Recipe Video
Notes
- Milk: Scald the milk around 170 degrees Fahrenheit. However, yeast dies at 138 degrees Fahrenheit, so allow the scalded milk to cool before using.
- Yeast: Active dry yeast lies dormant and needs a warm liquid to become “activated.” Store open jars of yeast in the refrigerator for up to 4 months or in the freezer for up to 6 months. Use straight from the freezer (no need to thaw). Unopened packets of yeast can be stored in a cool, dry place.
- Yield: This recipe makes 32 rolls. If you have the time, I highly suggest doubling the recipe and freezing extra rolls for future meals.
- Storage: Store cooled rolls in an airtight container for 3 to 4 days at room temperature, or store in the refrigerator for up to a week.
Is there a bread machine recipe for these.
Hi Linda, if there is, I don’t have it unfortunately. 🙁 Sorry about that!
Hi meggan. I love your writing. I have made bread for a long time and i always tell people to soften
Yeast in BARELY warm water—-NOT VERY WARM OR HOT. Too hot water will kill the yeast and the
Bread will be ruined right off the bat. Stick your finger in the water and it should feel Lukewarm. i I wish someone had told me this when i started to make bread. Just a thought.
Hi Tommie! Thank you so much for your kind words! I do think 110 degrees is okay (has always worked for me) but you are right, I should use the word “lukewarm” vs. “warm” so that anyone not using a thermometer doesn’t ruin the yeast. I’m probably the only person using a thermometer. 🙂 I so appreciate the suggestion! If you have any others, please send them my way. I appreciate your support. Take care!
Greetings, and thank you for the lovely recipe. I have been baking yeast breads off and on for over 50 years, and I still find it to be one of the more rewarding of my kitchen chores. I am hoping that you might be able to answer a question that I have had for almost as long as I have been using yeast. Why must the milk be scalded? The first answer that I ever had to this question was that scalding killed any micro-organisms present in the milk, so that they would not interfere with the action of the yeast. But that was my grandmother’s answer, and referred to times when raw milk from the local dairy farm was used in many kitchens. Seems to me that pasteurization should be taking care of all those little micro-organisms, so why do we still scald the milk? My second question has to do with your nutritional values, which list the calorie content for one roll at 3,710. I am thinking that must be the content for an entire batch of dough. Could you possibly check on that, please? Again, thank you for your very well presented recipe. Only through the efforts of people like you will these precious, family recipes be kept safe for the next generation — until that generation ages enough to learn to appreciate them!
Hi Patricia, thank you so much for your questions! First, I have no idea why we scald the milk. My grandma has since passed so I can’t ask her. However, I’m in culinary school so I will ask one of the baking and pastry instructors. I haven’t taking the baking classes myself yet, and probably won’t until next fall, but maybe they have some insights. I’ll email you when I’ve had a chance to speak to them. Regarding the nutrition info, thanks for your help finding that error. Sounds like it’s doing calories for the whole batch as you said! I’ll go take a look and get that fixed up. Thanks again and I’ll let you know what I can find out about scalded milk, if anything!
I Believe you only find scalding milk in older recipes like in our case “Mom’s” or “Grandma’s ” recipes. In bread machines you add dry yeast on top of the flour not in even in the liquid. Pasteurizing took care of that extra step. I too love to make yeast breads for almost 60 years now. I have not made crescents yet but I am anxious to try 🤗
I wanted to make breakfast croissant rolls with this recipe with egg cheese and sausage/bacon. Could I make the dough the night before, refrigerate then prep the rolls in the am for baking?
Hi Alicia! You know, I’ve never tried, but I don’t see why not. I think it would work very well. And the breakfast recipe idea sounds perfect!! I’m going to make these and try that out and see. I’ll post my results! Thanks for your idea. 😀
My great aunt used to prep them into rolls and then freeze them without any problem. You can also bake them until they are done but not brown and then freeze. Go ahead when you take them out and brown them in the oven before you want to serve them
Thank you for the great tips, Shesha!
Can you freeze the dough? If so, would you recommend freezing them before rolling them out? This recipe sounds great but I don’t think my little family could eat 32 rolls. 🙂
Hi Debra, I wasn’t sure about freezing bread dough so I wanted to look into it and supply you with accurate information. I found a great article at About.com which I will direct you to, but here is the overview. Yes, you can freeze bread dough. You will want to use double the yeast in your recipe for any portion you are going to freeze because part of it will die off in the freezing process. Let the dough do it’s first rise, then roll out and shape into rolls as normal. Freeze the rolls on a baking sheet, then transfer to a plastic bag and to keep in the freezer. Pull them out the night before you want to bake them so they can thaw and do their second rise. For more details, please check out this article. They explain it really well! Good luck! PS – I wish my family (my husband, me, and a toddler) did not eat 32 rolls in 2 days… but we always do! 🙂 http://breadbaking.about.com/od/beginnerbasics/ht/freezedough.htm
Thank you so mush for that well thought out and researched answer, I greatly appreciate your time. I will make an attempt soon and let you know how it works out. 🙂
Beautiful post, Meggan! These rolls look so soft and wonderful! I’ve pinned this for later!
I think these are similar to the rolls my Mom always makes…I definitely look forward to them at the holidays!
They make rolls with this kind of dough in France, Meggan (I spent a year there!) and I remember that they were so soft and light. Thanks for the bread-making tips … very helpful!
These pictures are fantastic! I’ve only recently started using yeast and usually it’s only for pizza dough. I didn’t know I should have it in the freezer!! Thanks!