This post contains affiliate links, which means I may earn a commission if you purchase through those links (at no extra cost to you).
Skip the coffee shop sous vide egg bites and make this Mini Quiche Recipe instead. Tucked inside a pastry crust, try all four flavor variations of this freezable egg breakfast recipe.

I’ve always had a soft spot in my heart for the tiny frozen quiches they sell at the store. But I resent buying a variety pack with flavors I don’t really want, so I developed my own recipe that I love even more.
Each of the 4 Mini Quiche combinations listed in the recipe card creates one dozen of a given variety, or 48 bite-sized mini muffin pieces total.
If you want to make a full recipe (48 pieces total) of a single flavor combination, you’ll need 4 eggs, 1 cup milk, ½ teaspoon salt, 12 ounces of cheese, and whatever other filling ingredients you like. Feel free to discard my ideas entirely and choose your favorite toppings.
Table of Contents
Recipe ingredients

At a Glance: Here is a quick snapshot of what ingredients are in this recipe.
Please see the recipe card below for specific quantities.
Ingredient notes
- Pie crust: Get a head start with frozen and thawed store-bought pie crust, or make a homemade pie crust from scratch. To make the crust in advance, make the dough, form it into a disk shape, wrap it tightly in plastic wrap and foil, and freeze for up to 2 months. To use, thaw pie dough overnight in the refrigerator, then roll out the crust before slicing with a biscuit cutter.
- Bacon: To crisp up a batch at once, I like to fry bacon in the oven. To do so, preheat the oven to 400 degrees. Line a rimmed baking sheet with foil for easy clean up. Set a rack on top if using. Arrange the bacon in a single layer. Bake until bacon is crispy (start checking at 10 minutes; I usually bake it for about 15 minutes).
- Swiss cheese: Pre-shredded cheese is tossed with agents to prevent the cheese from sticking together, but it should still melt and thicken up fine. For the best consistency, grate your cheese fresh from a block.
- Spinach: To wilt the spinach, place spinach into small saucepan and cover with water. Bring to a boil and cook until spinach is dark green and wilted. Alternatively, in a small saucepan, place the spinach with ¼ cup of water and sauté over medium high heat until wilted. Place spinach between two kitchen towels or paper towels and remove as much water as possible.
Step-by-step instructions
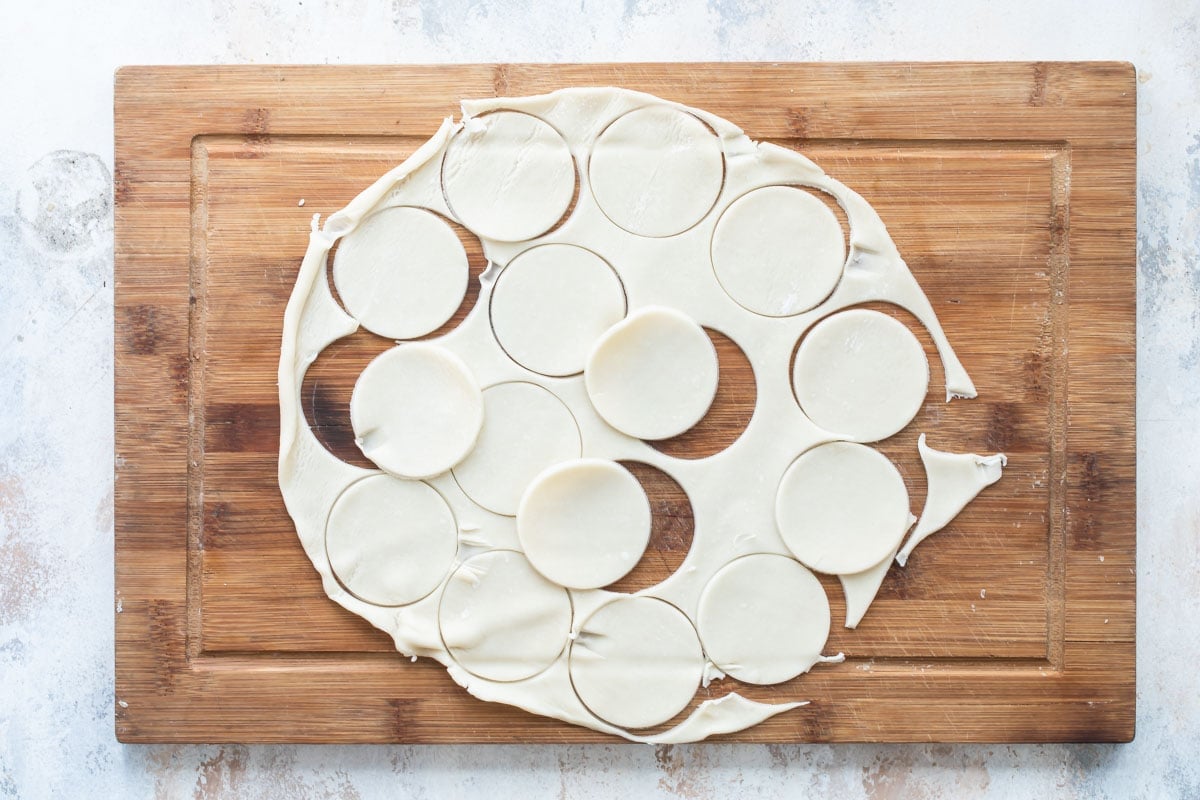
- Let the pie crusts stand at room temperature for 15 to 20 minutes. Preheat the oven to 375 degrees. Spray 48 miniature muffin cups with non-stick cooking spray. Open and unfold one pie crust, then press out any fold lines. With a 2-½ inch biscuit cutter or round cookie cutter, cut out 12 rounds. Repeat with remaining 3 pie crusts.
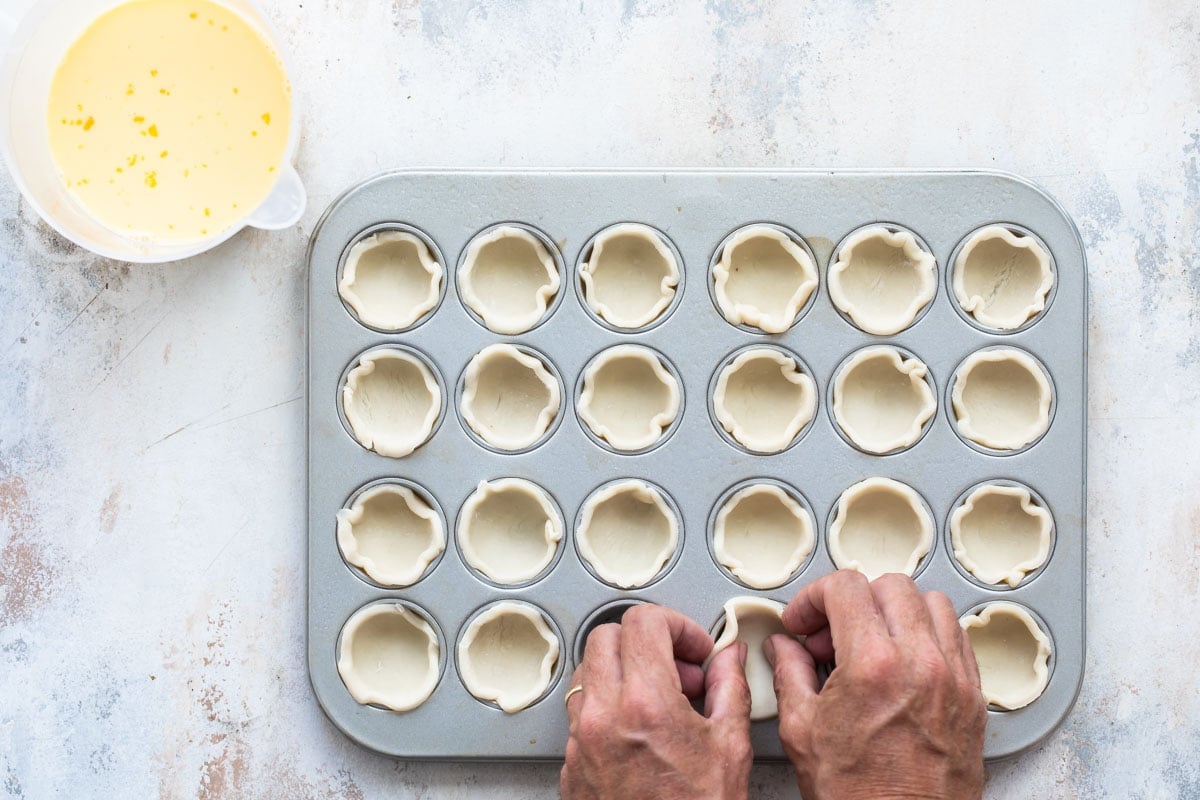
- In the prepared mini muffin tins, press 1 round of pie crust into the bottom and up the sides of the cup. In a 4-cup measuring cup or medium bowl, combine the eggs, milk, and the salt. Whisk well. Set aside.
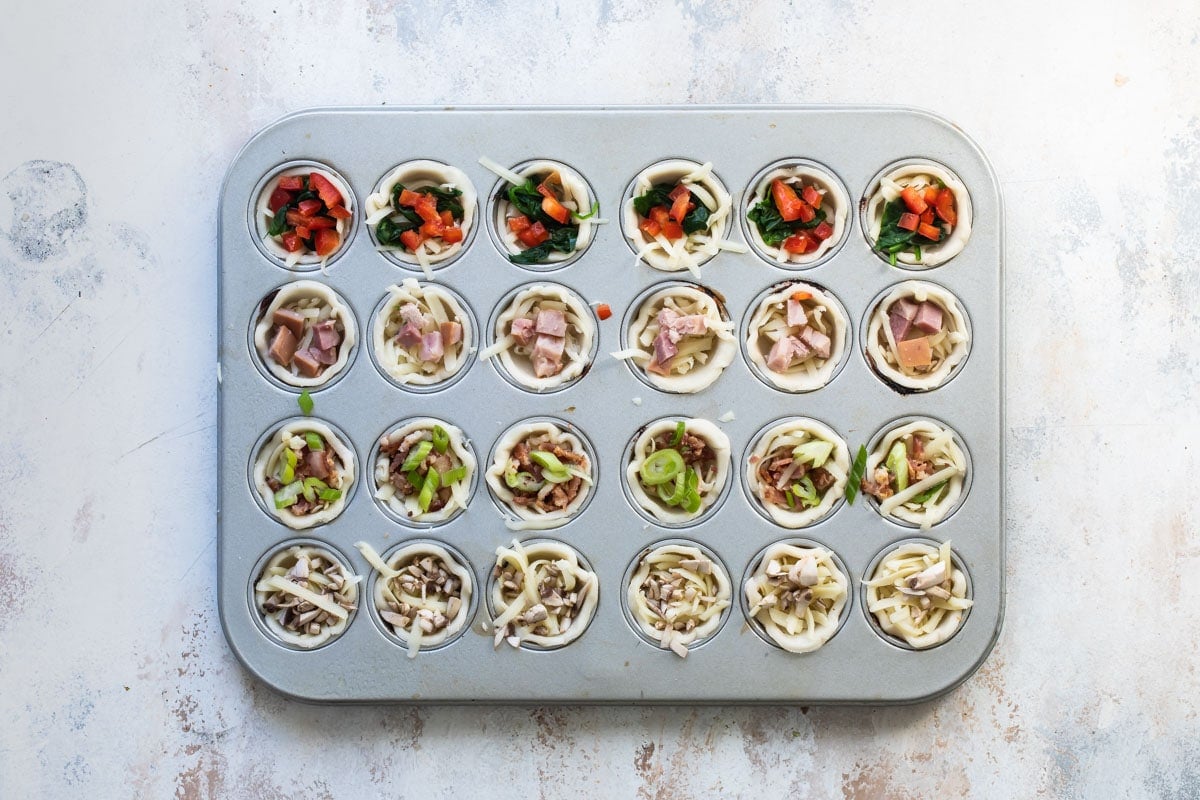
- In all 48 mini muffin cups, add 1 tablespoon cheese. For each variety (bacon, ham and cheese, spinach, and mushroom), divide the toppings equally among 12 mini cups (each variety gets 12 of the 48 mini muffin cups).
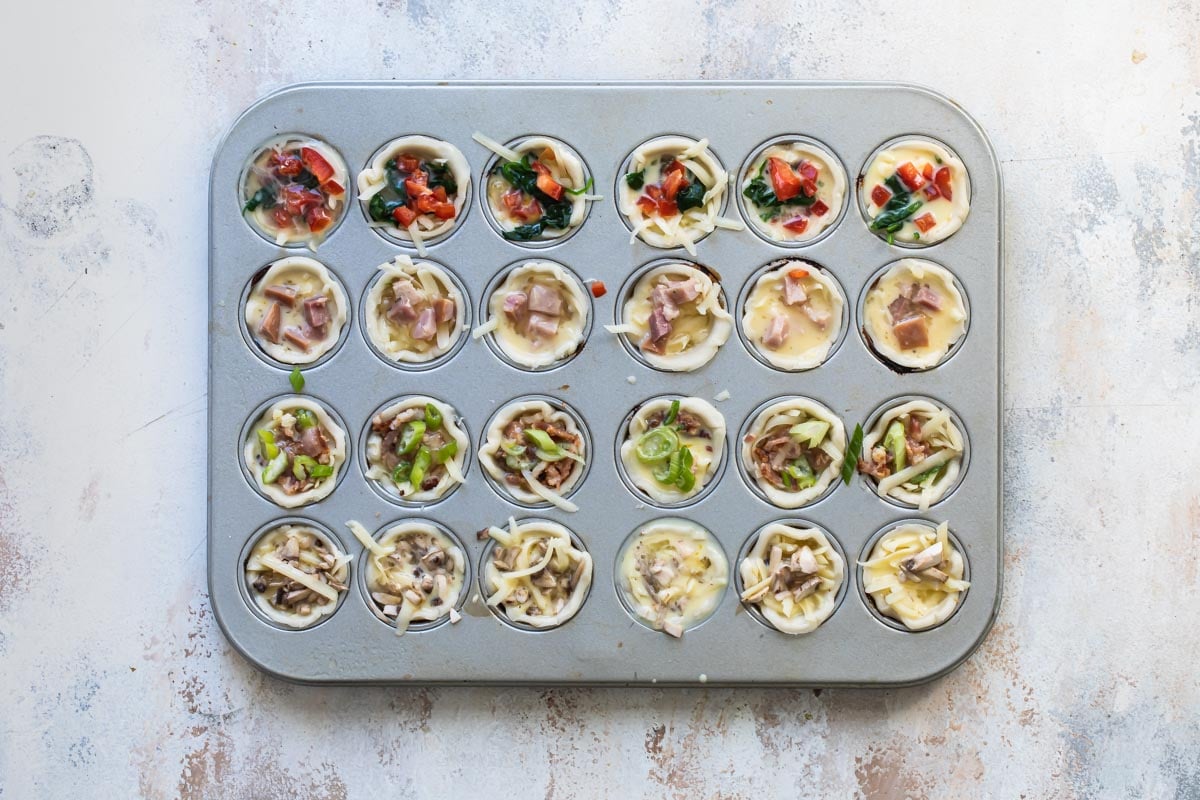
- Pour egg mixture into each of the 48 cups, filling to within ¼ inch of the top.
- Bake at 375 degrees until golden brown, about 25 to 30 minutes. Cool slightly and serve warm.

Recipe tips and variations
- Yield: Each of these Mini Quiche recipes creates one dozen of each of the four quiche varieties; 48 bite-sized mini muffin pieces total.
- Storage: Store leftovers covered in the refrigerator for up to 4 days.
- Freezer: Assemble, bake, and cool the Mini Quiches. Flash freeze the egg cups on a plate or baking sheet until they are solid, then transfer them to zip-top freezer bag (so they don’t stick together).
- Reheat: Bake the frozen mini quiche straight from the freezer. Transfer to a baking sheet and reheat in a 400-degree oven for 5 to 10 minutes.
- Crust swap: Feel free to substitute store-bought phyllo dough for the pie crust, if desired. Slice the same shape and at the same temperature as the pie crust. When reheating from frozen, reduce oven temperature to 220 degrees and reheat for about 20 minutes to prevent the phyllo dough from burning.
- Cheese: Use any cheese in this mini quiche that you love. Cheddar cheese and Swiss cheese are especially taste with ham and bacon, while Feta cheese or cream cheese are perfect with fresh spinach and red peppers. I love Gruyere or another alpine-style cheese with mushrooms.
- Quiche muffins: Slightly larger than the mini quiche, these quiche are baked in a regular-sized muffin pan instead of mini muffin pan.
- Egg muffins: For a healthy breakfast recipe that’s easy to make and easy to love, try my Starbucks copycat Egg Muffins. Bake a batch of these crustless muffins in a regular-sized muffin pan to enjoy now or freeze for a meal prep breakfast or snack.
- Quiche Lorraine: This classic, sliceable Quiche Lorraine has a buttery, flaky crust filled with fluffy egg custard and decadent bacon and is baked in a 9-inch pan.

Frequently Asked Questions
Quiche Lorraine is made with eggs, heavy cream, milk, bacon, Swiss cheese, onions, and fresh thyme baked in a pie crust.
It’s easiest to freeze mini quiche after you’ve already baked them. Flash freeze baked and cooled quiche on a plate or baking sheet until they are solid, then transfer them to zip-top freezer bag (so they don’t stick together). Bake the frozen mini quiche straight from the freezer. Transfer to a baking sheet and reheat in a 400-degree oven for 5 to 10 minutes.
More egg breakfasts

Breakfast Recipes
How to Fry Eggs

Breakfast Recipes
How to Scramble Eggs

Breakfast Recipes
How To Make An Omelet

Breakfast Recipes
How to Soft Boil Eggs
Join Us

Mini Quiche Recipe
Equipment
Ingredients
- 4 pie crusts thawed (homemade or from 2 boxes store-bought)
For the Mini Bacon Quiche:
- 3 ounces Swiss cheese grated
- 3 slices bacon fried and crumbled
- 2 tablespoons green onion sliced
For the Mini Ham and Cheese Quiche:
- 3 ounces Swiss cheese grated
- 1/4 cup (about 1.5 ounces) ham cubed
For the Mini Spinach Quiche:
- 3 ounces Swiss cheese grated
- 4 cups (3 ounces) spinach wilted (see notes)
- 1 tablespoon red bell pepper cubed
For the Mini Mushroom Quiche:
- 2 tablespoons (½ ounce) white button mushrooms trimmed and finely chopped
- 3 ounces Swiss cheese grated
Instructions
To prepare the crusts:
- Let the pie crusts stand at room temperature for 15 to 20 minutes. Preheat the oven to 375 degrees. Spray 48 miniature muffin cups with non-stick cooking spray.
- Open and unfold one pie crust, then press out any fold lines. With a 2-½ inch biscuit cutter, cut out 12 rounds. Repeat with remaining 3 pie crusts.
- In the prepared mini muffin tins, press 1 round of pie crust into the bottom and up the sides of the cup.
- In a 4-cup measuring cup, combine the eggs, milk, and the salt. Whisk well. Set aside.
To assemble the Mini Bacon Quiche:
- In 12 of the mini muffin cups, add 1 tablespoon of cheese. Evenly divide the chopped bacon among the 12 cups, using about ½ teaspoon bacon in each. Top with a couple slices of green onion.
To assemble the Mini Ham and Cheese Quiche
- In 12 of the mini muffin cups, add 1 tablespoon of cheese. Evenly divide the chopped ham among the 12 cups, using about ½ teaspoon ham in each.
To assemble the Mini Spinach Quiche
- In 12 of the mini muffin cups, add 1 tablespoon of cheese. Evenly divide the wilted spinach among the 12 cups, using about about ½ teaspoon spinach in each. Evenly divide the chopped red pepper among the mini muffin cups.
To assemble the Mini Mushroom Quiche
- In 12 of the mini muffin cups, add 1 tablespoon of cheese. Evenly divide the chopped mushroom among the 12 cups, using about ½ teaspoon mushroom in each.
To finish and bake the mini quiche:
- Pour egg mixture into each of the 48 cups, filling to within ¼ inch of the top. Bake at 375 degrees until golden brown, about 25 to 30 minutes. Cool slightly and serve warm.
Recipe Video
Notes
- Pie crust: Get a head start with frozen and thawed store-bought pie crust, or make your own pie crust from scratch. To make the crust in advance, make the dough, form it into a disk shape, wrap it tightly in plastic wrap and foil, and freeze for up to 2 months. To use, thaw it overnight in the refrigerator, then roll out the crust before slicing with a biscuit cutter.
- Bacon: To crisp up a batch at once, I like to fry bacon in the oven. To do so, preheat the oven to 400 degrees. Line a rimmed baking sheet with foil for easy clean up. Set a rack on top if using. Arrange the bacon in a single layer. Bake until bacon is crispy (start checking at 10 minutes; I usually bake it for about 15 minutes).
- Swiss cheese: Pre-shredded cheese is tossed with agents to prevent the cheese from sticking together, but it should still melt and thicken up fine. For the best consistency, grate your cheese fresh from a block.
- Spinach: To wilt the spinach, place spinach into small saucepan and cover with water. Bring to a boil and cook until spinach is dark green and wilted. Alternatively, in a small saucepan, place the spinach with ¼ cup of water and sauté over medium high heat until wilted. Place spinach between two kitchen towels or paper towels and remove as much water as possible.
- Yield: Each of these Mini Quiche recipes creates one dozen of each of the four quiche varieties; 48 bite-sized mini muffin pieces total.
- Storage: Store leftovers covered in the refrigerator for up to 4 days.
Is it necessary to grease the tins before adding the pie crusts? I worry about not being able to remove the finished quiches without sticking?
Hi Trisha
Hope you don’t mind me responding. Meghan does mention using the spray stuff to grease the muffin tin before you mould your pie crust into them..
Hi Trisha, yes! You’ll definitely want to spray the muffin tins first.
Hi
I am making these for my daughters baby shower.
What size of muffin tray do I need?
Sobia
Hi Sobia, you need a mini muffin pan. They have 24 mini muffin cups and are roughly 10.6 inches x 16.9 inches, depending on the brand. This recipe makes 48 mini quiches, so if you want to bake them all at the same time, you should get 2 pans. Otherwise you can make them and bake them in batches. This recipe is for 4 different flavors, but you could definitely make just 1 or 2 kinds or whatever you want to do. If you have any questions please let me know! Thank you! -Meggan
Also, what is the reason for wilting the spinach prior to adding to the egg mixture?
Hi Kayla, this is to get the excess water out of the spinach which also makes it smaller and flexible. If you try to visualize shoving raw spinach leaves into one of these baby quiche crusts, I don’t think it would go well. I hope that helps! Thanks! -Meggan
Hello!
If I make homemade crust, would I need to bake the crust a little then add the egg mixture and bake according to your recipe? Thank you!
Hi Kayla, it won’t matter if it is homemade crust or refrigerated. Since they are both uncooked, you will just need to bake for the time in the recipe. 🙂
Hi Kayla, if you bake the crust first, when you add the egg mixture, the crust will float up into the egg mixture and it won’t be on the bottom anymore. So, you don’t want to pre-bake the crust here, even if you make it yourself. Thanks! -Meggan
Amy 12/12/2019 asked about freezing before baking and you asked her what you had written that made her question that. I think it was this because I got the same impression: “ These bake up in 25 to 30 minutes at 375 degrees. If you freeze them ahead of time, bake them straight from the freezer and add 5 minutes to the baking time”.
It’s under the heading of “How long does it take to bake mini Quiche”
Hi Carla, I’m really sorry about the confusion with these. It does say in the “How long does it take to bake mini quiche” section to add 5 minutes to the baking time. That isn’t correct, it should say what I have written in the “how to freeze mini quiche” section, which is reheating from 5-10 minutes. I think I meant to type “add 5 minutes to your timer,” and wrote “add 5 minutes to your baking time.” I have retested this to make sure, and from freezer to baking sheet, at 400 degrees, it took 6 1/2 minutes for mine to be heated through. I will correct the post right away. My greatest apologies again. -Meggan
Hello,
I am confused by just the same as Amy: “These bake up in 25 to 30 minutes at 375 degrees. If you freeze them ahead of time, bake them straight from the freezer and add 5 minutes to the baking time.” I can not see how this can be understood otherwise than what we seem to.
Even after your explanation I still wonder: You really mean that you bake them the same length before serving as before freezing, and then bake them even longer than the first time when heating them up after freezing? :-O
Hi SKj, I’m really sorry about the confusion with these. It does say in the “How long does it take to bake mini quiche” section to add 5 minutes to the baking time. That isn’t correct, it should say what I have written in the “how to freeze mini quiche” section, which is reheating from 5-10 minutes. I think I meant to type “add 5 minutes to your timer,” and wrote “add 5 minutes to your baking time.” I have retested this to make sure, and from freezer to baking sheet, at 400 degrees, it took 6 1/2 minutes for mine to be heated through. I will correct the post right away. My greatest apologies again. -Meggan
Hello,
I have a few questions for ya!
1. The freezing methods are confusing, in one area you instructed that we would bake them as the recipe states, cool them and then freeze, then essentially pull from freezer and warm up in oven, in another area you mention what seems like freezing them assembled and raw then pulling from freezer and just adding to the bake time? I am trying to make these for work, we have an oven at work but I would like to have as little to do with it at work as possible but not compromising the tastiness. Can you help? lol
2. Can the pre made mini pie crusts just be used? or would the crust be too think?
Hi Amy, I’m so sorry for the confusion! I have never frozen them raw and then baked them, I tried to find what I might have written in the post to give you that impression and I didn’t see anything. So if you have time to point it out to me, I’d love to know what you read that made you think you should freeze them raw. I have always baked them and cooled them before freezing them. The “adding 5 minutes to the baking time” is IF you have frozen them, vs. just baking them straight after making them (when they would be raw but unfrozen, sitting there on the counter because you just finished assembling them), then it takes 5 minutes longer. So if you make them and everything is fresh and raw, you bake them for 25 to 30 minutes. If you have already done then (assembled them, baked them, and then cooled them down), you reheat them in basically the same way, but just reheat them a little longer than you baked them. So you end up baking them twice, but then second time is when they are frozen and you are just reheating them. Does that help? Have I made this all so much more confusing?? I hope not!
To your second question, I am not familiar with pre-made mini pie crusts. Is there a freezer product that is a bunch of tiny pie crusts? If so, it should work just fine. I use regular refrigerated pie crust and just cut out rounds. If there is something like that, already pre-cut, sure! Sounds like it would work fine.
Please let me know if I haven’t answered your questions or if you need anything else. Thank you! -Meggan
Made these today for a holiday open house this weekend. Now I am off to the store to buy more pie crusts because my husband was only supposed to “sample” just one for me and he ate almost 1/2 of them! This was a great quick and easy recipe! Thanks for sharing.
When using Pillsbury pre made pie crust do you cook the pie crust first once you put the 2 1/2” circles if crust in the mini cup cake pans? If so, what temperature and for how long?
Then once the pie crust is cooked, then put the quiche mixture in the baked crust???
Thank you.
Hi Elaine, you don’t pre-bake the crust. You cut out the circles, press then into the pan, and then add the filling. Then you bake them. I hope this helps! Thanks! -Meggan
I just made this recipe … actually, just the mushroom recipe… using Pepperidge Farms Puff Pastry. I have to say that I got too much puff and not enough quiche. I think the puff pastry over powers the ingredients. If you love puff pastry, it is still delicious. Next time I’ll used pie dough.